
Jeder Sprühkabinenleiter kennt die Frustration, die durch unerwartete Staubkontamination und frustrierende Lackdefekte entsteht. Schon ein einziges, unbemerktes Wartungsproblem kann die Oberflächenqualität schnell beeinträchtigen und die Sicherheit beeinträchtigen. Den Stand vor jedem Einsatz richtig einzurichten, ist der Schlüssel zu langlebiger Geräteleistung und jedem Mal makellosen Ergebnissen.
Dieser Leitfaden liefert umsetzbare Schritte, die mit bewährten globalen Standards für Sprühkabinen übereinstimmen. Wenn Sie diese von Experten unterstützten Verfahren befolgen, können Sie proaktiv Verunreinigungen verhindern, die Lackhaftung verbessern und Gefahren minimieren, die Ihren Arbeitsablauf gefährden. Machen Sie sich bereit, praktische Maßnahmen zu entdecken, die Sie sofort umsetzen können, um eine sicherere, sauberere und effizientere Sprühumgebung zu gewährleisten.
Inhaltsverzeichnis
- 1. Inspektion der Kabinenstruktur auf Staub und Schäden
- 2. Alle Oberflächen vor dem Aufbau reinigen
- 3. Installation hochwertiger Staubschutzfolie
- 4. Überprüfen Sie Lüftungs- und Filtersysteme
- 5. Türen, Fenster und Zugangspunkte versiegeln
- 6. Testbeleuchtung und Sichtbarkeitsfunktionen
- 7. Führen Sie abschließende Sicherheits- und Bereitschaftsprüfungen durch
Kurze Zusammenfassung
| Key Insight | Erklärung |
|---|---|
| 1. Regelmäßige Inspektion der Kabinenstruktur | Führen Sie gründliche Inspektionen durch, um Staubablagerungen und strukturelle Schäden zu identifizieren, um die Lackqualität zu erhalten und die Sicherheit der Arbeiter zu gewährleisten. |
| 2. Reinigen Sie Oberflächen vor der Einrichtung | Stellen Sie sicher, dass alle Kabinenoberflächen sauber sind, um Verunreinigungen zu vermeiden, die die Lackierungen beschädigen und Sicherheitsrisiken darstellen können. |
| 3. Installation hochwertiger Staubschutzfolie | Verwenden Sie hochwertige Staubschutzfolie, um Verunreinigungen zu minimieren und die Lebensdauer Ihrer Kabinenoberflächen zu verlängern. |
| 4. Überprüfen Sie HLK- und Filtersysteme | Überprüfen Sie, dass Ihre HLK- und Filtersysteme effektiv funktionieren, um die Luftqualität zu erhalten und die Staubrückführung zu reduzieren. |
| 5. Führen Sie abschließende Sicherheits- und Bereitschaftskontrollen durch | Führen Sie vor dem Besprühen umfassende Endkontrollen durch, um sicherzustellen, dass alle Systeme für einen sicheren Betrieb korrekt eingerichtet sind. |
1. Inspektion der Kabinenstruktur auf Staub und Schäden
Wann hast du das letzte Mal mit kritischem Blick in deine Sprühkabine geschaut? Die meisten Facility Manager gehen jeden Tag an ihren Kabinen vorbei, ohne wirklich zu beurteilen, was mit der Struktur selbst passiert. Der physische Zustand Ihres Standes beeinflusst direkt die Farbqualität, die Sicherheit der Mitarbeiter und die Funktionsweise Ihrer Staubkontrollsysteme. Bevor Sie ein weiteres Fahrzeug besprühen, benötigen Sie eine gründliche Inspektion, die über die oberflächliche Ebene hinausgeht.
Staubansammlung und strukturelle Schäden in Ihrem Stand wirken zusammen und verursachen eine Kaskade von Problemen. Laut den Richtlinien zur Inspektion von Kabinenstrukturen verhindern regelmäßige Wartungs- und Inspektionsverfahren eine Kontamination von Sprühflächen und gewährleisten die Integrität des Standes sowohl in Bezug auf Sicherheit als auch Leistung. Du suchst nach drei spezifischen Problembereichen: sichtbarer Staubablagerung an Wänden, Boden, Decke und Ansauglüftungen; strukturelle Schäden wie Dellen, Korrosion, Risse oder lose Paneele; und Dichtungsversagen um Türen, Fenster und Fugen zu beheben, an denen Luftlecks auftreten können. Wenn sich Staub in deiner Kabine gelegt hat, bleibt er nicht einfach da. Die Luftbewegung zirkuliert beim Sprühen, wodurch es auf nasser Farbe landet und die Qualität des Finishes ruiniert. Strukturelle Schäden verursachen zusätzliche Komplikationen, da beschädigte Wände und Dichtungen verhindern, dass Ihr Filtersystem effizient funktioniert. Eine Kabine mit Lücken oder beschädigten Bereichen kann keinen ausreichenden Druck und Luftstrom aufrechterhalten, was bedeutet, dass Staub und Verunreinigungen dorthin gelangen, wo sie nicht hingehören.
Beginnen Sie Ihre Inspektion mit einer einfachen Checkliste, die sich auf diese kritischen Bereiche konzentriert. Achten Sie auf Staubansammlungen auf waagerechten Flächen, insbesondere auf Vorsprüngen, Lüfterblättern und Ansaugfiltern, wo sich die Partikel am leichtesten absetzen. Überprüfen Sie Ihre Wände und Ihren Boden auf Anzeichen von Korrosion, was besonders in europäischen Klimazonen mit höherer Luftfeuchtigkeit häufig vorkommt. Überprüfen Sie alle Türdichtungen, Fensterdichtungen und Eckverbindungen auf Lücken oder Verschleiß. Systematische Inspektionsverfahren für die Innenräume von Sprühkabinen erkennen Staubkontaminationen und Wartungsprobleme, bevor sie die Beschichtungsqualität beeinträchtigen. Dokumentiere das, was du findest, mit Fotos und Notizen, damit du verfolgen kannst, ob die Probleme schlimmer werden oder stabil bleiben. Das Ziel ist nicht Perfektion beim ersten Versuch. Es geht darum, einen Ausgangspunkt für den aktuellen Zustand Ihres Stands zu etablieren und zu erkennen, was sofortige Aufmerksamkeit benötigt und was im nächsten Wartungszyklus behoben werden kann.
Profi-Tipp: Planen Sie Ihre Standinspektion jeden Monat zur gleichen Zeit, zum Beispiel am ersten Montag, und fotografieren Sie jedes Mal dieselben Bereiche aus denselben Winkeln, damit Sie die Verschleißmuster über mehrere Monate visuell verfolgen können.
2. Alle Oberflächen vor dem Aufbau reinigen
Die Reinigung deiner Sprühkabine vor dem Aufbau ist nicht optional. Es ist die Grundlage, die entscheidet, ob Ihre Lackierung makellos ist oder durch Verunreinigungen beeinträchtigt wird. Viele Facility Manager unterschätzen, wie viel Staub, Rückstände und Schmutz sich zwischen den Arbeiten in ihren Kabinen ansammeln, und dieser übersehene Schritt kostet ihnen Zeit, Materialien und Kundenzufriedenheit. Bevor Sie Ihr nächstes Fahrzeug oder Produkt zur Beschichtung bringen, muss jede Oberfläche in diesem Stand sauber sein.
Warum ist das so wichtig? Schadstoffe auf Kabinenoberflächen verursachen beim Sprühen mehrere Probleme. Wenn Luft durch Ihre Kabine zirkuliert, werden Staub oder Rückstände aufgenommen und zur Arbeitsfläche transportiert. Nach bewährten Sprühtechniken reduziert eine gründliche Oberflächenreinigung die Belastung durch Verunreinigungen bei der Lackhaftung und senkt Sicherheitsrisiken, indem Staub und Übersprühablagerungen minimiert werden. Jeder Fleck, der sich auf Ihrer frisch gesprühten Farbe absetzt, wird zu einem Defekt, den Sie abschleifen und neu lackieren müssen, was Zeitverlust und verlorenes Material bedeutet. Über Qualitätsbedenken hinaus beeinflussen schmutzige Kabinenoberflächen auch die Sicherheit der Arbeiter. Angesammelte Übersprüh- und Staubwolken schaffen Brandgefahren in Sprühumgebungen und können auch Partikel freisetzen, die Arbeiter einatmen. Eine umfassende Oberflächenreinigung vor dem Betrieb verhindert Verunreinigungen von Beschichtungsmaterialien und sorgt für eine sicherere Arbeitsumgebung, indem sie die Ansammlung gefährlicher Rückstände reduziert.
Hier ist dein praktischer Ansatz zur Oberflächenreinigung. Beginnen Sie mit dem Boden Ihrer Kabine und verwenden Sie ein feuchtes Tuch oder einen Wischmopp, um Staub aufzufangen, anstatt ihn einfach mit einem trockenen Besen herumzuschieben. Gehe zu den Wänden und wische sie von oben nach unten ab, damit die Schwerkraft dir hilft, effizient zu arbeiten. Vergessen Sie nicht die oft übersehenen Bereiche wie Leuchten, Abluftöffnungen, Einlassfliegen und den oberen Teil Ihres Sprühpistolenhalters. Diese waagerechten Flächen fangen mehr Staub als vertikale Wände. Sobald du alles abgewischt hast, benutze einen Staubsauger mit HEPA-Filter, um eventuelle verbleibende Partikel aufzufangen, die du vielleicht übersehen hast. Der gesamte Prozess dauert je nach Größe Ihres Standes 30 bis 45 Minuten, verhindert aber stundenlange Nachbearbeitungen bei fehlerhaften Oberflächen. Betrachte das als Investition in deinen nächsten perfekten Job.
Profi-Tipp: Weisen Sie einem Teammitglied zu, die jeden Morgen eine Checkliste für die Sprühreinigung durchführt und sie vor der Ankunft des ersten Fahrzeugs in die Kabine abschließt, damit Sauberkeit zu einer festen Routine und nicht zu einer nachträglichen Idee wird.
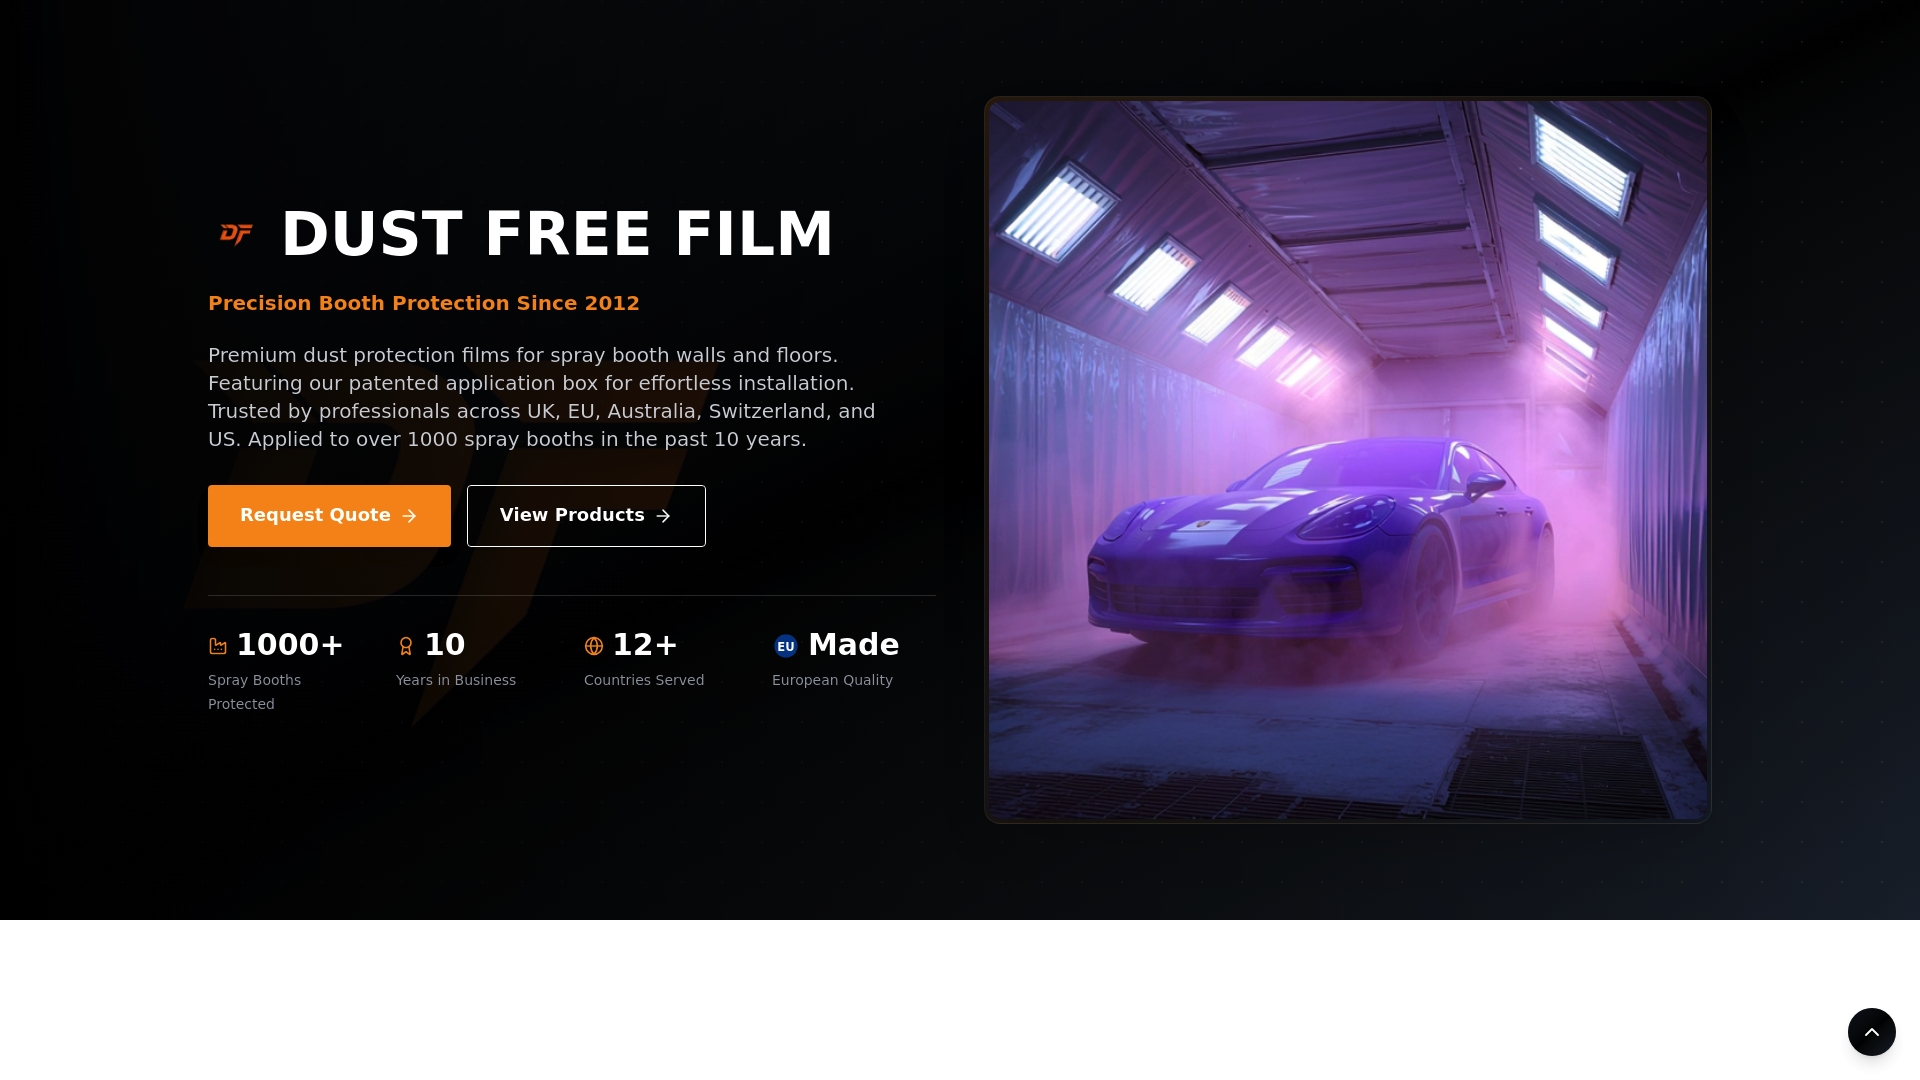
3. Installation hochwertiger Staubschutzfolie
Staubschutzfolie ist die erste Verteidigungslinie Ihrer Sprühkabine gegen Verunreinigungen. Dieser einzelne Schritt verwandelt Ihren Stand von einer Staubansammlungskammer in eine kontrollierte Umgebung, in der sich die Farbqualität mit jedem Auftrag tatsächlich verbessert. Wenn du dich immer noch auf manuelle Reinigung zwischen jedem einzelnen Spray verlässt, arbeitest du härter als nötig und bekommst schlechtere Ergebnisse. Das Anbringen hochwertiger Staubschutzfolie verändert alles, wie Ihr Betrieb funktioniert.
Die Wissenschaft hinter Staubschutzfolie ist einfach, aber leistungsstark. Wenn du in deiner Kabine sprühst, bewegt die Luftzirkulation ständig Staubpartikel. Diese Partikel setzen sich auf nasser Farbe ab und verursachen Defekte, die geschliffen und neu lackiert werden müssen. Hochwertige Filme wirken als austauschbare Barrieren, die diese Verunreinigungen auf ihrer Oberfläche auffangen und eindämmen, anstatt sie an Ihr Werk zu lassen. Laut Schutzmaßnahmen in Sprühkabinen schützen Staubschutzfolien die Innenräume und sorgen für schadstofffreie Umgebungen, wodurch sowohl Sicherheit als auch Beschichtungsqualität gewährleistet sind. Die Filme verlängern außerdem die Lebensdauer Ihres Innenraums, indem sie den direkten Kontakt zwischen Farbübersprühung und dauerhaften Kabinenoberflächen reduzieren. Wenn Ihre Wände mit Übersprührückständen bedeckt werden, werden sie schwerer zu reinigen und entwickeln schließlich raue Stellen, die Luftturbulenzen verursachen. Mit Schutzfolie entfernen Sie die verschmutzte Schicht einfach nach einer Arbeit oder wenn sie zu verschmutzt ist, wodurch eine saubere Oberfläche darunter freigelegt wird. Die Wartungspraktiken von Lackierkabinen zeigen, dass Staubschutzfolien Verunreinigungen verhindern und die Lebensdauer im Innenraum verlängern, indem sie Farb- und Schmutzansammlungen reduzieren, was sie zur Standardpraxis zur Aufrechterhaltung der Effizienz und Sicherheit der Kabine macht.
Die Installation des Films erfordert Planung, liefert aber sofortige Erfüllung. Du bedeckst deine Kabinenwände, den Boden und manchmal auch die Decke, je nach Setup und den Lackierungen, die du sprühst. Qualität ist hier wichtig, weil billige Filme leicht reißen, an den Nähten nicht richtig abschließen oder selbst Partikel abgeben, was den gesamten Zweck zunichtemacht. Achten Sie auf Filme, die eine mehrschichtige Konstruktion, statischenfreien Schutz und Hitzebeständigkeit für Ihre Sprüharbeiten bieten. Sobald sie installiert sind, bleiben die Filme an Ort und Stelle, bis sie zu verschmutzt werden, um sie effektiv zu benutzen, dann ersetzen Sie sie. Für die meisten Großvolumen-Autorenovierungswerkstätten bedeutet das, dass Wand- und Bodenschutz alle 2 bis 4 Wochen gewechselt wird, je nach Sprühvolumen. Die Ersatzkosten sind im Vergleich zu dem Material, das Sie sparen, gering, da Sie keine kontaminierten Arbeiten neu besprühen müssen.
Profi-Tipp: Beim Anbringen der Schutzfolie messen Sie die Abmessungen Ihres Kabinens sorgfältig und fügen Sie 10 Prozent mehr Material hinzu, um überlappende Nähte, Falten und Abfall auszugleichen, um eine vollständige Abdeckung ohne Lücken zu gewährleisten, in denen Staub entweichen könnte.
4. Überprüfen Sie HLK- und Filtersysteme
Ihre HLK- und Filtersysteme sind die unsichtbaren Arbeiter in Ihrer Sprühkabine, die bestimmen, ob der Staub tatsächlich entfernt wird oder einfach wieder auf Ihre frisch gestrichenen Oberflächen zurückgetragen wird. Die meisten Facility Manager überprüfen diese Systeme reaktiv, wenn etwas schiefgeht, aber bis dahin haben Sie bereits kontaminierte Oberflächen besprüht. Die Luftqualität deines Kabinens hängt ganz davon ab, wie gut diese Systeme funktionieren, und eine Überprüfung vor dem Aufbau sollte nicht verhandelbar sein.
Zu verstehen, was Filtration effektiv macht, hilft Ihnen zu verstehen, warum dieser Schritt wichtig ist. Beim Sprühen zieht das HLK-System der Kabine Luft durch Ansauglüftungen, bewegt sie über den Arbeitsbereich und lässt sie wieder ab. Unterwegs sollen Filter Staub und Verunreinigungen aufnehmen, damit sie nicht zurück in Ihre Kabine gelangen. Aber hier ist, was die meisten Menschen nicht erkennen: Ein verstopfter Filter oder einer mit der falschen Effizienzwertung wirkt aktiv gegen dich. Nach den HLK-Filterstandards werden Filter mit Minimum Efficiency Reporting Value (MERV)-Bewertungen von 13 oder höher effektiv Staub und luftgetragene Partikel erfasst, wobei regelmäßige Wartung entscheidend für eine optimale Belüftung ist. Ein MERV-13-Filter erfasst etwa 90 Prozent der Partikel, die nur 1 Mikrometer groß sind, während ein minderwertiger MERV-8-Filter nur etwa 20 Prozent dieser Partikel auffängt. Der Unterschied wirkt sich direkt auf die Farbqualität. Die Wartungsrichtlinien für HLK-Systeme betonen, dass die Optimierung der Filtration mit hochwertigen Filtern und regelmäßigen Inspektionen unerlässlich ist, um die Luftqualität zu erhalten und Kontaminationsrisiken zu verringern.
Bevor Sie mit dem Sprühen beginnen, inspizieren Sie Ihre Filter und Ansauglüftungen persönlich. Achten Sie auf sichtbare Schmutzansammlungen, Verfärbungen oder ein einengendes Gefühl, wenn Sie Ihre Hand in der Nähe des Einlasss halten. Verschmutzte Filter verringern den Luftstrom, was bedeutet, dass Ihr Kabine keinen richtigen Druck- und Zirkulationsmuster aufrechterhalten kann. Überprüfen Sie, dass alle Dichtungen im Filtergehäuse intakt sind und keine Lücken haben, in denen ungefilterte Luft den Filter komplett umgehen kann. Hören Sie, wie Ihr HLK-System läuft. Wenn es lauter klingt als üblich oder Schwierigkeiten hat, die richtige Geschwindigkeit zu erreichen, müssen Filter wahrscheinlich ersetzt werden. Die meisten Sprühkabinen sollten je nach intensiver Nutzung alle 4 bis 8 Wochen die Filter wechseln, aber bei staubigen Standorten müssen Sie möglicherweise häufiger wechseln. Führen Sie ein Wartungsprotokoll, dokumentieren Sie, wann Sie die Filter wechseln, und notieren Sie alle Performance-Probleme, die Sie beobachten. Das schafft ein Muster, das Ihnen hilft, vorherzusagen, wann Probleme auftreten werden, bevor sie eine Oberfläche ruinieren.
Profi-Tipp: Markieren Sie Ihre Austauschdaten für Filter in einem sichtbaren Kalender in Ihrer Kabine und stellen Sie eine Woche vorher Handy-Erinnerungen ein, damit Sie Zeit haben, Ersatz zu bestellen, damit Sie während kritischer Produktionsphasen nie ausgehen.
5. Versiegeln von Türen, Fenstern und Zugangspunkten
Kleine Spalten an Ihren Kabinentüren, Fenstern und Zugängen verursachen massive Probleme für Luftqualität und Staubkontrolle. Jede winzige Öffnung lässt ungefilterte Luft in Ihren Stand eindringen und bringt Staub und Verunreinigungen direkt in Ihre Sprühumgebung. Wenn Ihr Stand zugig ist oder Sie beim Sprühen Staub in der Nähe des Eingangs aufwirbeln sehen, haben Sie Abdichtungsprobleme, die vor Ihrem nächsten Auftrag sofort behoben werden müssen.
Warum ist das Versiegeln so wichtig? Ihre Sprühkabine arbeitet mit einer sorgfältigen Luftdruckbalance. Das HLK-System zieht Luft durch Einlassöffnungen an und lässt sie wieder ab, wodurch ein Unterdruck entsteht, der Sprühnebel und Staub zum Auspuff zieht. Aber wenn Türen, Fenster und Zugangspunkte Lücken haben, strömt die Außenluft unkontrolliert herein und stört dieses Druckgleichgewicht. Diese einströmende Luft transportiert Staub und Schadstoffe, die Ihr Filtersystem vollständig umgehen. Außerdem werden gefährliche Sprühdämpfe ohne ordnungsgemäße Abdichtung nicht sicher aufgefangen und ausgesandt. Laut Dichtungs- und Dichtungsmethoden ist eine ordnungsgemäße Abdichtung von Türen, Fenstern und Zugangspunkten entscheidend, um zu verhindern, dass Staub und Schadstoffe in Ihre Kabine eindringen oder entweichen, während Umwelteinflüsse standhalten. Türmontagestandards betonen, dass eine ordnungsgemäße Abdichtung gefährliche Partikel eindämmt und die Sicherheit gewährleistet, indem unbeabsichtigten Luftaustausch verhindert wird.
Beginnen Sie damit, mit ausgeschaltetem Licht um Ihren Stand herumzugehen und suchen Sie nach Lichtrissen, die um Türrahmen, Fensterkanten und Versorgungsdurchführungen hereinfallen. Das sind nicht nur ästhetische Probleme. Das sind Kontaminationswege. Überprüfen Sie Ihre Türdichtungen und Dichtungsleisten auf Kompression, Risse oder dauerhafte Verformungen. Wenn sie hart statt schwammig sind, schließen sie nicht mehr effektiv ab. Ersetzen Sie abgenutzte Dichtungen sofort, da sie im Vergleich zur Reparatur einer kontaminierten Oberfläche kostengünstiger sind. Bei Fenstern sollten Sie sicherstellen, dass die Dichtmasse rund um den Rahmen intakt ist, ohne Lücken oder Abspaltungen. Übersehen Sie nicht Service-Zugangstüren, Kabelanschlüsse und andere Öffnungen, an denen Geräte oder Versorgungsleitungen Ihren Stand betreten. Verwenden Sie Hochtemperatur-Dichtungsleisten oder Dichtungsmaterial, das für die Sprühkabinen geeignet ist. Standard-Dichtungsleisten überstehen eine Übersprühung von Farbe nicht. Sobald es versiegelt ist, testen Sie Ihren Stand, indem Sie alle Türen und Fenster schließen, und verwenden Sie dann einen Hand-Rauchstab in der Nähe vermuteter Lücken. Der Rauch wird zu etwaigen Luftlecks gezogen und zeigt Ihnen genau, wo Probleme bestehen.
Profi-Tipp: Dokumentieren Sie bei der ersten Inspektion den Zustand aller Dichtungen und Dichtungen mit Fotos und fotografieren Sie dann monatlich dieselben Bereiche, um Verschleißmuster zu verfolgen und Austausch zu planen, bevor Dichtungsfehler Probleme mit der Sprühqualität verursachen.
6. Testbeleuchtung und Sichtbarkeitsfunktionen
Gute Beleuchtung in deiner Sprühkabine ist kein Luxus. Das ist eine grundlegende Voraussetzung für die Qualität der Farbe und die Sicherheit der Arbeiter. Wenn Sie Defekte, Staub oder Oberflächenunregelmäßigkeiten nicht klar erkennen, sprühen Sie Probleme über, die zuvor hätten behoben werden müssen. Bevor Sie mit einer Sprühsession beginnen, müssen Sie überprüfen, ob Ihr Beleuchtungssystem voll funktionsfähig ist und eine ausreichende Sicht über den gesamten Arbeitsbereich bietet.
Warum ist die Kabinenbeleuchtung so wichtig? Lackdefekte werden nur unter angemessenen Lichtverhältnissen sichtbar. Ein Kratzer oder Staubfleck, der bei schwachem Licht unsichtbar wirkt, wird bei heller, gleichmäßiger Beleuchtung auffällig. Ihre Maler müssen die Qualität der Oberflächenvorbereitung überprüfen, bevor sie sprühen, während der Arbeit Kontaminationen punktieren und ihre Arbeit nach der Anwendung inspizieren. Schlechte Beleuchtung führt zu übersehenen Mängeln, die erst sichtbar werden, wenn das Fahrzeug Ihre Werkstatt verlässt, was Kundenbeschwerden und Reparaturkosten bedeutet. Über Qualitätsbedenken hinaus schafft unzureichende Beleuchtung auch Sicherheitsrisiken. Die Arbeiter können Verschüttungen, elektrische Gefahren oder Stolperhindernisse nicht klar erkennen. Laut dem Design von Innen- und Außenbeleuchtungssystemen empfehlen umfassende Leitlinien, die Funktionalität und Sichtbarkeit der Beleuchtung zu überprüfen, um einen sicheren und effektiven Betrieb in Industrieanlagen zu gewährleisten. Beleuchtungssystemstandards legen Wert auf regelmäßige Funktionstests von Licht- und Sichtbarkeitskontrollen in Arbeitsumgebungen wie Sprühkabinen, um die Sicherheit des Bedieners und die Einhaltung der Beleuchtungsanforderungen sicherzustellen.
Ihr Testprozess sollte unkompliziert und wiederholbar sein. Schalten Sie alle Lichter in der Kabine ein und gehen Sie durch Ihren Sprühbereich, wobei Sie die Helligkeit in verschiedenen Höhen und Abständen von Lichtquellen beobachten. Du suchst nach dunklen Stellen, in denen Schatten dominieren, oder Bereichen, in denen die Helligkeit deutlich geringer ist als die umliegenden Räume. Achten Sie besonders auf Ecken, unter dem Sprühpistolenhalter und an den Rändern der Kabine, wo häufig ungleichmäßige Beleuchtung auftritt. Überprüfen Sie, ob alle Leuchten sauber sind und frei von Staub oder Farbübersprüh, die die Lichtleistung verringern. Eine mit Überspray beschichtete Leuchte kann 30 bis 40 Prozent weniger Licht erzeugen als eine saubere. Teste alle verstellbaren Beleuchtungsfunktionen wie Helligkeitsregler oder Richtungsleuchten, um sicherzugehen, dass sie reibungslos funktionieren. Wenn Sie spezialisierte Lampen für die Detailinspektion haben, aktivieren Sie diese und überprüfen Sie, ob sie die vorgesehenen Arbeitsbereiche beleuchten, ohne starke Schatten zu erzeugen. Dokumentieren Sie die Lichtverhältnisse mit Fotos aus der Perspektive Ihres Malers auf Arbeitsebene. Das gibt Ihnen einen Basis, mit dem Sie bei zukünftigen Inspektionen vergleichen können.
Profi-Tipp: Planen Sie Beleuchtungskontrollen sofort nach dem Wechsel oder Reinigen der Kabinenschutzfolie, da sich Staub und Überspray schnell auf den Armaturen ansammeln und die Sichtbarkeit innerhalb weniger Wochen nach regelmäßigem Sprühen verringern.
7. Durchführung der abschließenden Sicherheits- und Bereitschaftskontrollen
Sie haben Ihre Kabinenstruktur inspiziert, Oberflächen gereinigt, Schutzfolie installiert, Ihr HLK-System überprüft, alle Öffnungen abgedichtet und Ihre Beleuchtung getestet. Jetzt kommt der letzte Schritt, der alles zusammenführt. Bevor Sie ein einzelnes Fahrzeug oder Produkt besprühen, müssen Sie umfassende endgültige Sicherheits- und Bereitschaftskontrollen durchführen, die bestätigen, dass Ihr gesamter Stand als einheitliches System funktioniert. Hier erkennt man eventuelle Probleme, die in früheren Schritten vielleicht übersehen wurden.
Abschließende Sicherheits- und Bereitschaftskontrollen erfüllen einen entscheidenden Zweck, der über routinemäßige Wartung hinausgeht. Sie stellen sicher, dass alle Ihre individuellen Vorbereitungen tatsächlich zusammenarbeiten, um eine sichere, saubere Sprühumgebung zu schaffen. Eine Kabine kann neue Filter, abgedichtete Türen und gute Beleuchtung haben, aber wenn diese Systeme nicht richtig kommunizieren, gibt es trotzdem Probleme. Zum Beispiel könnten neue Filter mit einer abgedichteten Kabine einen übermäßigen Druck erzeugen, der eine ordnungsgemäße Luftzirkulation verhindert. Laut den Checklisten für die Wartungscheckliste der Lackierkabine umfassen die Abschlussinspektionen Funktionstests der Notfallausrüstung, Belüftungssysteme und eine saubere Sauberkeitsprüfung, um eine sichere Arbeitsumgebung vor Betriebsbeginn zu gewährleisten. Operational Readiness Frameworks legen Wert auf umfassende Endsicherheitsprüfungen, die sicherstellen, dass alle Sicherheits- und Kontrollsysteme funktionsfähig sind, Gefahren kontrolliert und das Personal geschult und ausgerüstet ist, um sicher voranzukommen.
Beginnen Sie damit, Ihren Stand einen kompletten Zyklus ohne Arbeit im Inneren durchführen zu lassen. Aktivieren Sie Ihr HLK-System und hören Sie auf normale Betriebsgeräusche. Überprüfen Sie, ob Lufteinlass und Abluft reibungslos funktionieren, ohne Vibrationen oder ungewöhnliche Geräusche. Öffnen und schließen Sie die Türen mehrmals, um sicherzustellen, dass sich die Dichtungen richtig zusammendrücken und die Scharniere sich frei bewegen. Geh durch den Stand und beobachte, wie sich die Luft bewegt, achte auf wirbelnde Muster oder tote Zonen, in denen die Luft stagniert. Teste deine Notabschalter und stelle sicher, dass sie beim Aktivieren sofort den Strom abschalten. Überprüfen Sie alle elektrischen Verbindungen und Steckdosen auf Schäden oder Wassereinflüsse. Stellen Sie sicher, dass Ihr Sprühpistolenhalter sicher sitzt und richtig positioniert ist. Überprüfen Sie, dass alle Abfallentsorgungsbehälter leer und korrekt platziert sind. Geh ein letztes Mal mit frischem Blick durch den Stand und stell dir vor, du sprühst ein hochwertiges Finish. Wenn etwas nicht stimmt oder sich nicht stimmt, kümmere dich darum, bevor du dein erstes Fahrzeug bringst. Dieser letzte Rundgang zeigt Überraschungen, die Oberflächen ruinieren oder Sicherheitsprobleme verursachen könnten.
Profi-Tipp: Erstellen Sie eine schriftliche Checkliste, die speziell auf Ihr Standlayout zugeschnitten ist, und gehen Sie diese jeden Tag vor Ihrem ersten Auftrag durch, wobei Sie jedes abgeschlossene Item unterschreiben, damit Sie eine Dokumentation haben, die belegt, dass Ihr Stand verifiziert und betriebsbereit war.
Nachfolgend eine umfassende Tabelle, die die wichtigsten Verfahren und Überlegungen zur Aufrechterhaltung einer effektiven Sprühkabinenumgebung zusammenfasst, wie im Artikel besprochen.
| Hauptbereich | : Wichtige Aktionsergebnisse | |
|---|---|---|
| Inspektion der Kabinenstruktur | Überprüfen Sie sichtbaren Staub, strukturelle Schäden und die Dichtungsintegrität; Dokumentiere die Ergebnisse. | Verbesserte Lackqualität und Sicherheit. |
| Saubere Oberflächen | Verwenden Sie feuchte Tücher, wischen Sie die Wände ab, saugen Sie Oberflächen; Konzentriere dich auf versteckte Staubfallen. | Verringerte Kontamination. |
| Staubschutzfolie installieren | Tragen Sie hochwertige Staubschichten auf Wände und Böden mit überlappenden Nähten auf. | Verbesserte Leistung und Lebensdauer des Standes. |
| Wartung von HLK-Systemen | Filter regelmäßig inspizieren und austauschen; Überprüfen Sie die Luftstromeffizienz. | Optimale Luftqualität und gleichmäßige Lackierungen. |
| Versiegelungsöffnungen | Inspektion und Austausch von Dichtungen für Türen und Fenster; Überprüfen Sie Lichtspalten mit Rauchtests. | Minimierung von Verunreinigungen und verbesserte Luftstromkontrolle. |
| Testbeleuchtung | Helligkeit und Gleichmäßigkeit überprüfen; Reinigen Sie die Armaturen, um die Beleuchtung aufrechtzuerhalten. | Verbesserte Sichtbarkeit bei Defekten und Mitarbeitersicherheit. |
| Führen Sie abschließende Prüfungen durch | Prüfe die Kabinensysteme, beurteilen Sie die Luftzirkulation und überprüfen Sie die Notfallsysteme vor der Nutzung. | Vereinheitlichte Kabinenfunktionalität für sichere und effektive Abläufe. |
Verbessern Sie Ihr Sprühkabinen-Setup mit hochwertigen Staubschutzlösungen
Die Einrichtung Ihrer Sprühkabine, um eine staubfreie, sichere und effiziente Umgebung zu gewährleisten, ist entscheidend, um makellose Lackierungen zu erzielen. Der Artikel "7 wesentliche Schritte für eine Checkliste für den Aufbau einer Sprühkabine" hebt kritische Herausforderungen hervor, wie Staubansammlung, strukturelle Integrität, Dichtungslücken und die Effektivität des Filtersystems. Diese Faktoren wirken sich direkt auf die Lackqualität und die Betriebssicherheit aus, sodass für jeden Facility Manager gründliche Inspektionen, Oberflächenreinigungen und Schutzmaßnahmen nicht verhandelbar sind.
Dust Free Film adressiert diese Probleme mit innovativen, hochwertigen Staubschutzfolien, die dafür entwickelt wurden, Ihren Stand sauberer und Ihren Arbeitsablauf reibungsloser zu gestalten. Unsere mehrschichtigen elektrostatischen Wand- und Fußbodenschützer werden schnell mit einem patentierten blasenfreien System installiert, das eine sofortige Barriere gegen Staubkontamination bietet. Unsere Filme sind auf Haltbarkeit, statische Beständigkeit und Hitzebeständigkeit ausgelegt und helfen dabei, die Stabilität der Kabine zu erhalten und gleichzeitig häufige Reinigungen oder kostspielige Nachlackierungen erheblich zu reduzieren. Durch die Integration unserer Premium-Produkte können Sie Ihre Beschichtungsergebnisse sicher verbessern und Ihre Investitionen in HLK- und Filtersysteme schützen.
Entdecken Sie, wie Sie Ihre Sprühkabine mit effektiver Staubkontrolle verstärken können, indem Sie Dust Free Film besuchen.
Verbessern Sie jetzt Ihr Sprühkabinen-Umfeld für überlegene Lackierungen und höhere Produktivität.
Entdecken Sie unsere Staubschutzfolien-Lösungen, um loszulegen.
Erfahren Sie mehr über die Sauberkeit von Sprühkabinen und wie unsere Produkte in Ihr umfassendes Setup passen.
Sehen Sie, wie einfach es ist, Qualitätsschutzfolie zu installieren und noch heute die Kontrolle über die Leistung Ihres Standes zu übernehmen.
Häufig gestellte Fragen
Was sind die ersten Schritte zur Vorbereitung einer Sprühkabine vor der Nutzung?
Um eine Sprühkabine vorzubereiten, beginnen Sie mit einer gründlichen Inspektion auf Staubansammlung und strukturelle Schäden. Reinigen Sie anschließend alle Oberflächen, um eine kontaminationsfreie Umgebung zu gewährleisten und das Risiko von Defekten in Ihrer Lackoberfläche zu minimieren.
Wie oft sollte ich die Oberflächen meiner Sprühkabine reinigen?
Reinigen Sie vor jedem Einsatz die Oberflächen Ihrer Sprühkabine, um eine optimale Farbqualität zu gewährleisten. Weisen Sie einem Teammitglied zu, eine tägliche Checkliste für die Sprühreinigung zu erstellen und zu befolgen, mit dem Ziel, diese Routine jeden Morgen vor dem Einfahren des ersten Fahrzeugs in die Kabine abzuschließen.
Was sollte ich in den HLK- und Filtersystemen inspizieren?
Überprüfen Sie regelmäßig Ihre HLK- und Filtersysteme und achten Sie auf verstopfte oder schmutzige Filter, die den Luftstrom behindern und zu Farbkontaminationen führen könnten. Ersetzen Sie alle 4 bis 8 Wochen die Filter und führen Sie ein Protokoll über Austauschdaten, um eine gleichbleibende Luftqualität zu gewährleisten.
Wie kann ich sicherstellen, dass meine Sprühkabine eine ordnungsgemäße Abdichtung hat?
Um eine ordnungsgemäße Abdichtung sicherzustellen, inspizieren Sie Spalten um Türen, Fenster und Zugänge auf Luftlecks. Ersetzen Sie abgenutzte oder komprimierte Dichtungen sofort, da diese entscheidend sind, um luftdichte Bedingungen zu gewährleisten und das Eindringen von Verunreinigungen in die Kabine zu verhindern.
Warum ist Beleuchtung in einer Sprühkabine wichtig?
Gute Beleuchtung ist in einer Sprühkabine unerlässlich, um Oberflächenmängel und Verunreinigungen vor dem Auftragen von Farbe zu erkennen. Überprüfen Sie regelmäßig die Beleuchtungsfunktionalität und reinigen Sie die Armaturen, um eine ausreichende Sicht im Arbeitsbereich zu gewährleisten und sicherzustellen, dass beim Sprühen keine Probleme übersehen werden.
Empfohlen
- Staubfreie Folie zum Schutz der Sprühkabine | Wand und Boden
- Staubfreie Folie zum Schutz der Sprühkabine | Wand und Boden
- Staubfreie Folie zum Schutz der Sprühkabine | Wand und Boden
- Staubfreie Folie zum Schutz der Sprühkabine | Wand und Boden
- Leitfaden zum Vakuumguss – Master-Prototyping für Präzisionsteile