
TL;DR:
- Dust prevention starts with proper booth setup, including dedicated prep areas and air control measures.
- Full panel clear coatings are preferred for durability and OEM compliance over blending techniques.
- Consistent cleanliness, process discipline, and team accountability are crucial for achieving flawless automotive paint finishes.
Dust defects are the number one reason paint jobs come back for rework, and every callback costs you time, materials, and customer trust. Whether you run a high-volume collision center or a boutique refinishing shop, the pressure to deliver flawless finishes on tight deadlines is constant. The good news is that most dust-related failures are preventable with the right setup, materials, and daily habits. This guide walks you through every stage of the painting process, from booth layout and material selection to application technique and finish strategy, so you can cut defects, reduce waste, and build a reputation for quality work.
Table of Contents
- Set up your painting and prep areas for success
- Choose the right materials for your conditions
- Apply with technique: Masking, plastics, and ADAS concerns
- Full panel clear or blend? Making the right finishing call
- Top dust-control practices for consistent, flawless results
- The overlooked keys to flawless automotive painting
- How Dust Free Film simplifies flawless paint results
- Frequently asked questions
Key Takeaways
| Point | Details |
|---|---|
| Separate prep areas | Dividing prep and application spaces is critical to stop dust migration and ensure consistently clean paintwork. |
| Climate-matched materials | Choosing the right hardeners and reducers for your temperature and humidity reduces defects and improves finishes. |
| Smart surface handling | Following OEM specs and careful prep routines prevents rework and avoids costly ADAS sensor problems. |
| Full panel clear for durability | Full panel clearcoats outperform blends for longevity and warranty, especially on modern vehicles. |
| Routine dust control wins | Daily booth cleaning, anti-static wipes, and vacuum sanding significantly cut paint defects and drive productivity. |
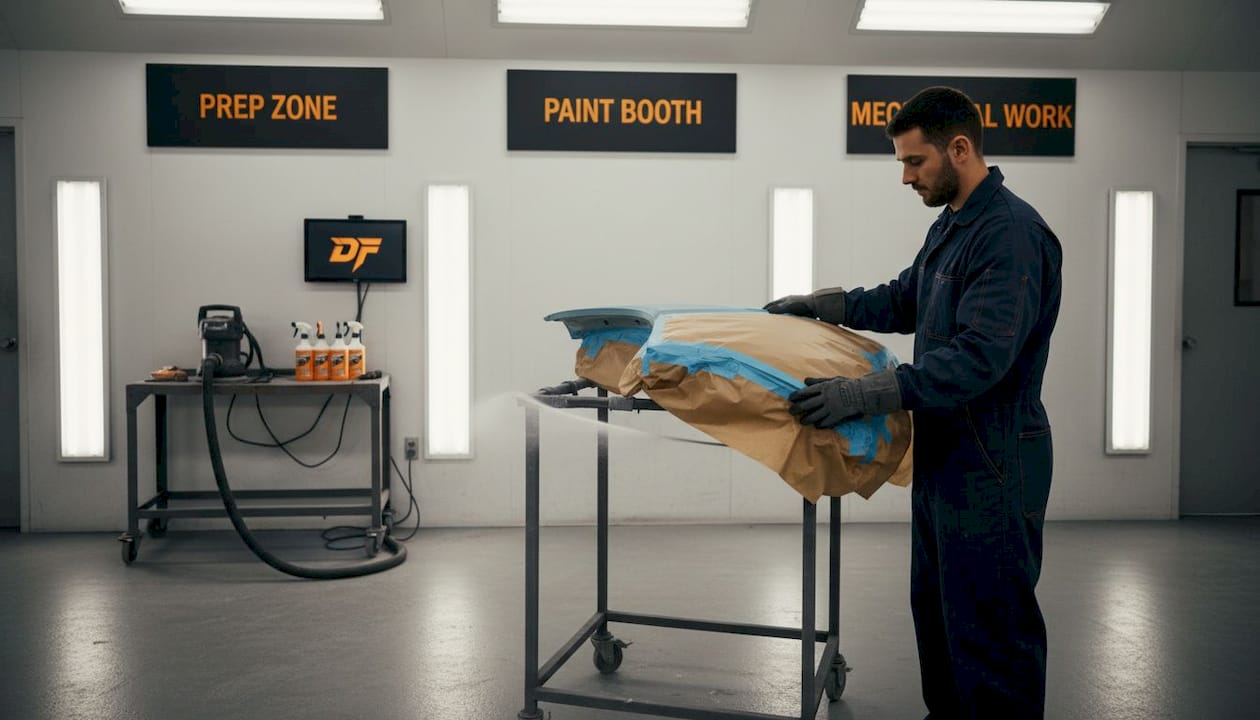
Set up your painting and prep areas for success
Your paint results are determined long before you pull the trigger on a spray gun. The physical layout of your facility is either protecting your finish quality or actively working against it. Getting this right is foundational.
The most important step is physical separation. Prep and masking work generates enormous amounts of dust and debris. If that work happens in or near your spray booth, you are essentially loading your booth with the very contaminants you are trying to avoid. According to 3M’s guidance on setup, a true dust-free environment requires dedicated prep and masking areas located away from the booth, combined with vacuum-assisted sanding systems, anti-static wipes on panels, positive booth pressure, and clean air lines.
Here is what each of those elements actually does for you in practice:
- Vacuum-assisted sanding systems capture dust at the source before it ever becomes airborne. A standard random orbital sander without extraction can put millions of particles into the air that settle on surfaces for hours.
- Dedicated prep and masking zones keep the heavy contamination sources isolated, so your booth stays cleaner longer between scheduled cleaning cycles.
- Anti-static wipes on panels neutralize the static charge that literally pulls dust particles back onto a freshly cleaned surface. This step takes 60 seconds and prevents hours of polishing.
- Positive air pressure in the booth means air is always flowing outward, so contaminants cannot drift in through gaps or door openings.
- Clean, filtered air lines prevent oil mist and moisture from your compressor from contaminating your spray pattern.
“A clean booth starts before the car ever rolls in. Every particle you control outside the booth is one less you have to fight inside it.”
Once panels are prepped and masked, do not stage them on the shop floor next to grinding or welding work. Designate a clean holding area specifically for prepped vehicles waiting to enter the booth. This one habit alone can eliminate a surprising number of last-minute contamination events.
Pro Tip: Assign one team member per shift to be responsible for the holding area and booth entry process. Accountability prevents shortcuts that lead to rework.
Pairing these layout improvements with solutions that actively improve paint quality at the booth wall and floor level gives you a layered defense against contamination. If you are managing a larger operation, looking into industrial dust control solutions tailored to high-volume environments will further protect your throughput.
Choose the right materials for your conditions
Even a perfectly clean booth will produce defect-heavy work if your materials are not matched to the conditions. Temperature and humidity have a direct impact on how paint flows, flashes, and builds, and they change every season.
Here is a step-by-step approach to matching materials to your environment:
- Check booth temperature and humidity before every job. Do not rely on seasonal memory. Ambient conditions shift daily, and even small changes matter.
- Select hardeners and thinners rated for your current conditions. Sherwin-Williams recommends using slower hardeners and thinners in high-heat situations to extend open time and allow the film to properly flow and level before flashing.
- Mix only what you will use per coat. Mixing large batches leads to material sitting in the pot too long, which causes settling and micro-contamination that shows up as texture defects in your finish.
- Upgrade your nozzle size in hot or dry conditions. A larger spray gun orifice lets you apply a wetter coat, compensating for the faster evaporation rate that pulls the film too quickly and leaves a rough, dusty surface.
- Choose anti-static formulations for primers and clearcoats when your shop environment is prone to static buildup, especially in dry climates or during winter heating season.
Statistic spotlight: Even minor humidity swings of 10 to 15 percent can increase paint defects by over 15%. Most shops underestimate this variable until they track defect rates alongside weather data for a full quarter.
Pro Tip: Before committing to a full panel on an unfamiliar substrate or during an unusual weather day, spray a test card and check it under a light. Adjust your reducer-to-hardener ratio based on what you see. A two-minute test can save a 45-minute repaint.
Keeping your booth environment clean and controlled is equally important for material performance. A quick review of the link between clean booths for better finish quality will reinforce why the environment and the material choice are inseparable.
Apply with technique: Masking, plastics, and ADAS concerns
Modern vehicles demand a higher level of technical precision than ever before. Bumpers, trim pieces, mirror housings, and sensor covers all have specific prep and coating requirements. Getting this wrong causes adhesion failures and can actually interfere with safety systems.
Start by identifying the plastic type before you do anything to it. Primed plastics and raw (unprimed) plastics require different preparation sequences. Sanding a raw plastic with an aggressive abrasive can create micro-grooves that trap air and cause lifting. Industry guidance recommends scuffing panels with a water-based paste rather than dry abrasives, followed by a proper adhesion promoter and sealer before any color or clearcoat goes down.
Here is the recommended layer sequence and thickness targets for common plastic parts:
| Step | Product type | Target thickness |
|---|---|---|
| Surface prep | Water-based scuff paste | Surface treatment only |
| Adhesion promoter | Flexible adhesion promoter | Thin coat, no build |
| Sealer | Flexible sealer | 1 mil (25 microns) |
| Base coat | Waterborne or solvent base | Per manufacturer spec |
| Clearcoat | Flexible clear | Minimum 2 mils (50 microns) |
| ADAS sensor zones | No filler, no blend | Maximum 115 microns total |
The last row is critical. Advanced driver assistance systems (ADAS), including radar-based adaptive cruise control and blind spot monitoring, rely on sensors mounted behind painted surfaces. OEMs have established firm limits on total coating thickness over these zones, typically capping total film build at 115 microns. Exceed that, and you risk muffling the signal. More importantly, never apply body filler or perform blended repairs over radar sensor housings, even if the surface looks undamaged.
Good paint booth contamination prevention practices during the plastic prep and coating stages protect you from a second category of failure: contamination-related adhesion loss caused by airborne debris settling on tacky sealer or base coat before the clear goes down.
Full panel clear or blend? Making the right finishing call
This debate comes up in virtually every shop, and the answer has gotten clearer as OEM requirements have tightened. Blending clearcoat into an adjacent panel saves time and can produce visually seamless results in the short term. But durability is a different story.
| Factor | Full panel clearcoat | Blend clearcoat |
|---|---|---|
| Long-term durability | High, uniform film protection | Reduced at blend edges |
| UV resistance | Complete coverage | Fades at feathered zones |
| Warranty coverage | Supported by most suppliers | Often excluded |
| OEM compliance | Preferred for sensor zones | Not recommended near ADAS |
| Time required | Slightly longer | Faster per repair |
| Rework risk | Lower over time | Higher at blend edges |
“Axalta requires full panel clearcoat for warranty coverage. Blending poses a risk of long-term finish failure that exposes both the shop and the customer to preventable problems.”
Axalta’s updated refinishing position makes this explicit. Blending is not compliant with their warranty terms, and the long-term failure risk is real. UV exposure and chemical contact degrade blended clear edges significantly faster than full-panel applications. If a customer returns in 18 months with peeling or clouding at a blend zone, the repair cost is entirely on your shop.
Full panel clears are the professional standard for a reason. They protect the entire painted surface uniformly, they satisfy supplier and OEM requirements, and they reduce the chance of a comeback. The small time savings of blending rarely justify the warranty and durability trade-off.
When you are committed to holding dust control methods to a high standard, full panel work also means the entire surface must be contaminant-free before the clear goes on. That raises the stakes for every prior step in the process.
Top dust-control practices for consistent, flawless results
If you strip everything down to the essentials, three categories of practice drive the biggest reductions in dust-related defects: source control, environment control, and process discipline.
3M’s framework for separating prep areas from the booth and using vacuum sanding as a primary control has proven effective across shops of all sizes. Floor staging and booth scheduling further optimize throughput while reducing contamination risk.
Statistic spotlight: Properly maintained, dust-controlled spray booths can cut paint defects by up to 90%. That number sounds dramatic, but it holds up when you track rework rates before and after implementing a full dust-control system.
Here are five steps to build a dust-free workflow starting this week:
- Audit your current layout. Walk through prep to spray and identify every point where dust can transfer to a prepped panel. Write it down.
- Install or upgrade vacuum sanding extraction on all prep stations. This is your highest-return investment in contamination control.
- Create a clean panel staging zone. Even a taped-off area with plastic sheeting on walls and floors beats open-shop staging.
- Implement a daily booth cleaning checklist. Floors, walls, lights, and door seals all collect contamination that recirculates with air movement.
- Track contamination events. Every defect that comes back from a job gets logged with a cause code. Review weekly with your team.
Pro Tip: Documenting contamination events is not about blame. It is about data. Within a month, you will see patterns that reveal your highest-risk steps, and fixing those specific steps produces faster improvement than general reminders to “be more careful.”
Reviewing top dust control solutions for spray booths and understanding the full benefits of dust-free painting will help you build a business case for any equipment or process investment your team needs.
The overlooked keys to flawless automotive painting
After years of working with shops across different market segments, one pattern is consistent: the shops with the fewest defects are not always the ones with the newest equipment. They are the ones where booth cleanliness and process discipline are simply non-negotiable daily habits.
A $200 set of anti-static wipes and a 10-minute morning booth wipe-down prevent more defects than a $15,000 spray gun upgrade used in a dirty environment. That is not an exaggeration. The fundamental contamination controls, wipe-downs, filter checks, separate staging, and vacuum sanding, solve about 90 percent of dust problems in any shop. What most shops lack is not the knowledge or even the tools. It is consistent execution.
Staff buy-in is the real variable. When every technician understands that booth cleanliness is a shared professional standard rather than a manager’s preference, defect rates drop and stay down. The shops that have seen dust-free booths cut paint defects by 90% did not get there with a single technology purchase. They got there by making clean practices part of how every person on the team does their job, every shift.
The real competitive edge in refinishing is not a new clearcoat formula or a smarter spray gun. It is a culture where every technician owns the cleanliness of their environment and the integrity of the process. Build that culture, and the technology you already have will perform better than equipment in a shop that treats contamination control as optional.
How Dust Free Film simplifies flawless paint results
Everything covered in this article, from booth setup and material choice to finish strategy and team discipline, points to one bottom line: a clean, controlled booth environment is what separates shops that rework one in ten jobs from shops that rework one in a hundred.
Dust Free Film’s multi-layer electrostatic booth wall and floor protection films make it faster and easier to maintain that clean environment every single day. Our patented dispenser system allows quick, bubble-free installation on walls and floors, and each layer peels away cleanly when contaminated, revealing a fresh surface instantly. The films are heat-resistant, static-free, and built for high-volume shop conditions. If you are ready to bring dust control from a daily struggle to a solved problem, explore our full range of spray booth protection solutions or request a quote today and see what consistent cleanliness can do for your defect rates.
Frequently asked questions
What is the best way to keep dust out of a paint booth?
The most effective approach combines vacuum sanding systems, dedicated prep areas separate from the booth, anti-static wipes, and maintaining positive air pressure so contaminants cannot drift inward during spraying.
Why avoid blending clearcoat on automotive panels?
Blending clearcoat creates feathered edges that degrade faster under UV and chemical exposure, and major suppliers like Axalta exclude blended repairs from warranty coverage, making full panel clear the safer professional choice.
How do OEM paint limits for ADAS sensors affect refinishing?
OEMs restrict total coating thickness over sensors to a maximum of 115 microns to prevent signal interference, which means refinishers must track film build carefully and avoid applying filler or blended repairs in those zones.
Which anti-static methods help most with dust in auto paint shops?
Anti-static wipes applied directly to panels before spraying, combined with anti-static formulated primers and clearcoats, are the most practical and cost-effective methods to reduce dust attraction on painted surfaces.
How often should you clean and maintain a spray booth for best results?
Spray booths should be cleaned at the end of every shift, with floors, walls, and light fixtures all wiped down, and filters should be inspected weekly and replaced as soon as airflow or efficiency drops noticeably.