
TL;DR:
- Dust control in automotive finishing requires a comprehensive, system-level approach involving airflow, filtration, and meticulous housekeeping. Proper procedures, quality tools, and surface protection films are essential for consistently achieving dust-free results and avoiding costly rework. Implementing these practices prevents contamination at every stage, safeguarding surface quality and enhancing shop reputation.
Even the most skilled technicians can open a spray booth door after a perfect application and find the surface covered in tiny dust nibs that ruin an otherwise flawless coat. It’s one of the most persistent frustrations in automotive refinishing, and it costs real money. Rework, wet sanding, recoating, and unhappy customers all trace back to one root cause: an uncontrolled dust environment. This guide walks you through every layer of a proven, systems-level approach to dust-free finishing, so your booth delivers the results your shop is capable of, every single time.
Table of Contents
- Understand why dust control is a system, not a single fix
- Essential tools and steps for achieving dust-free finishes
- Control airflow and filtration to stop dust at the source
- Housekeeping and prep-area dust capture: best practices
- End-of-line cleaning: the final step before coating
- Our perspective: the hidden cost of “good enough” dust control
- How Dust Free Film supports your dust control system
- Frequently asked questions
Key Takeaways
| Point | Details |
|---|---|
| Dust control is a system | No single product or step will deliver true dust-free results—integrating airflow, filtration, cleaning, and prep is required. |
| Airflow and filtration are critical | Proper airflow design and filter maintenance are the shop’s first line of defense against airborne contaminants. |
| Housekeeping methods matter | Vacuum-only protocols and avoiding sweeping or compressed air in prep areas significantly reduce dust entering the spray zone. |
| Final surface clean is essential | A thorough tack cloth wipe just before painting prevents visible dust nibs and rework. |
| Continuous verification required | Condition-based checks—like manometer reads—catch issues before they ruin finishes, especially in busy or dirty seasons. |
Understand why dust control is a system, not a single fix
After setting the stage, it’s vital to recognize why no single fix delivers true dust-free results. Many shop owners invest in expensive intake filters and then wonder why they still see contamination. The answer is usually that they fixed one link in a chain while leaving others broken.
Dust control is a systems problem: air path design, filtration, maintenance, prep-area dust capture, and end-surface cleaning all interact. Relying on only one element like filters alone is simply not sufficient. Every part of the process creates an opportunity for contamination to enter, and every gap becomes a quality defect waiting to happen.
Think of it as a pipeline. Contaminants can enter at multiple points:
- Booth air supply if intake filters are clogged, undersized, or improperly sealed
- Prep and adjacent areas where sanding dust becomes airborne and migrates
- The vehicle surface itself if not properly cleaned before coating
- Technician clothing and movement inside the booth
- Booth walls, floors, and fixtures that hold residual overspray and shed particles
“A shop that invests in a premium downdraft booth but skips proper housekeeping routines is like buying a high-performance engine and running it without oil. Each component depends on the others.”
Understanding this pipeline logic is what separates shops that consistently deliver flawless improving spray booth air quality from those that deal with recurring defects. The good news is that once you see the full picture, you can build a repeatable system that scales across your team and every job.
The same principle applies in precision contexts well beyond automotive, as anyone who has followed strict finishing in prototyping workflows will recognize. When surface quality is non-negotiable, every step in the process must be controlled, not just the most visible ones.
Essential tools and steps for achieving dust-free finishes
With this understanding, let’s lay out exactly what tools and workflow you need. Having the right equipment staged and ready is not optional. Without it, even the best technique breaks down under real shop conditions.
Here is a quick reference for the tools every serious shop should have on hand:
| Tool | Purpose | When to use |
|---|---|---|
| Differential pressure manometer | Measure filter loading and airflow balance | Weekly checks and after heavy use |
| Anti-static HEPA vacuum | Remove settled dust without re-aerosolizing it | Daily booth and prep area cleaning |
| Vacuum sanding shroud | Capture sanding dust at the source | Every sanding operation in prep bay |
| Fresh tack cloths (folded) | Final surface wipe before coating | Immediately before spraying |
| Spray booth wall and floor film | Prevent overspray buildup on surfaces | Applied fresh per job cycle |
| Filter replacement supplies | Restore airflow efficiency | Per manufacturer schedule or readings |
| Booth-safe cleaning solution | Wipe down walls, fixtures, and floors | Weekly deep cleaning |
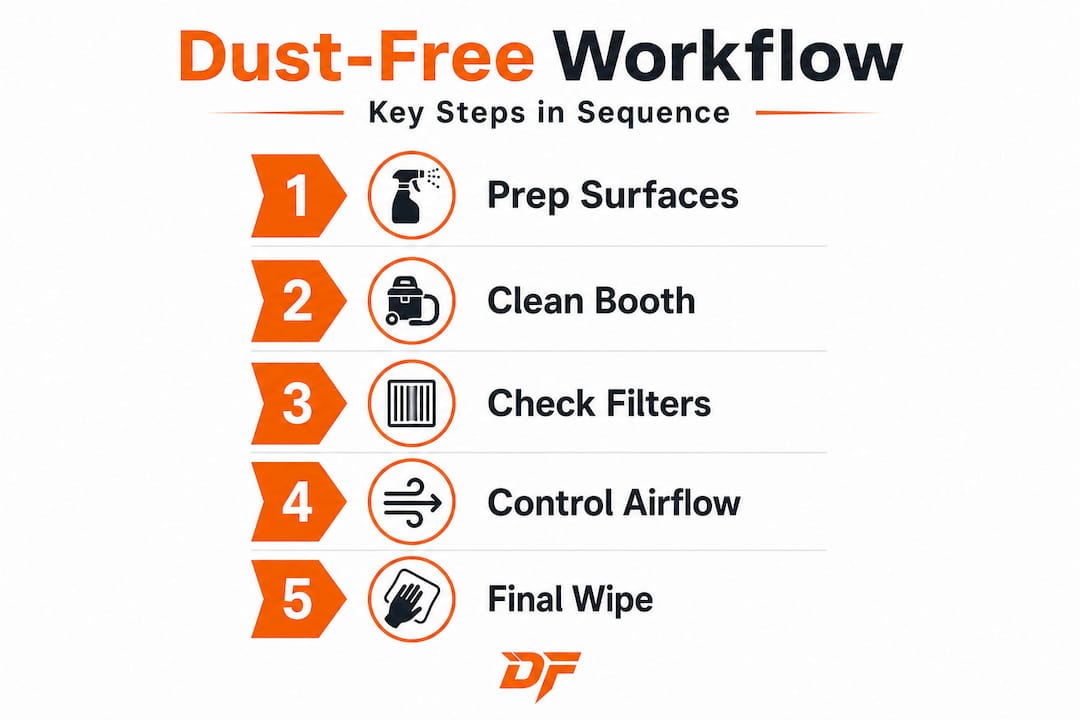
With your tools organized, follow this sequence on every job:
- Design and verify airflow and pressurization before the first spray of the day. Check that the booth holds proper positive pressure and that air moves in a clean laminar pattern from intake to exhaust.
- Inspect and maintain filtration at both intake and exhaust stages. Replace or service as readings indicate, not just on a calendar.
- Execute professional housekeeping in both the prep bay and the booth. Vacuum all surfaces; never sweep or blow down with compressed air.
- Prepare the vehicle thoroughly before it enters the booth. Remove sanding dust, wipe with solvent-based prep solution, and allow full flash-off time.
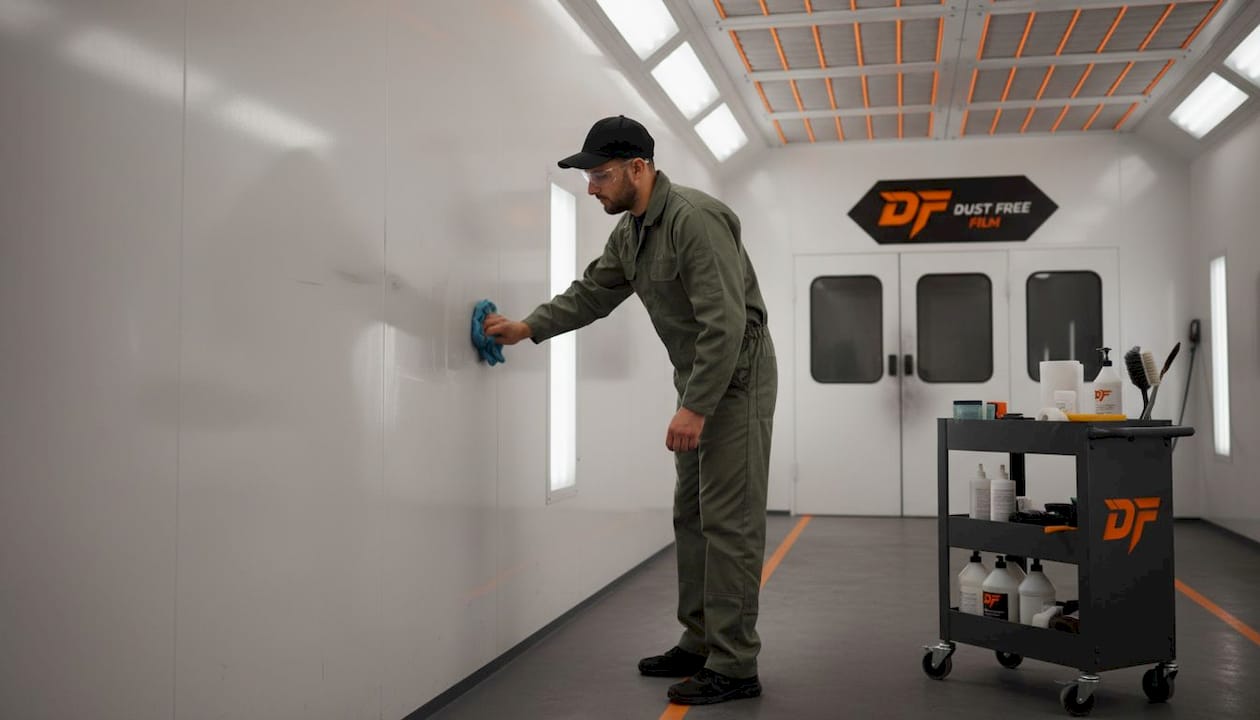
- Perform final surface cleaning immediately before coating using fresh tack cloths and clean gloves.
Pro Tip: Optimizing spray booth airflow is not a one-time setup task. Pressure and airflow patterns shift as filters load up and seasons change. Build a 5-minute pre-shift check into your morning routine to catch drift before it affects a job.
These essential spray booth setup tips sound straightforward, but the discipline of following them on every single job, not just when a job is high-profile, is what separates high-output shops from those stuck in constant rework cycles.
Control airflow and filtration to stop dust at the source
Once your basic toolkit is in place, make airflow and filtration management your primary technical focus. Nothing else in your process compensates for poor air movement. Dust that stays airborne long enough will land on wet paint.
Proper booth pressurization and airflow control are the foundation of achieving dust-free automotive paint finishes. Laminar flow, where air moves in smooth, parallel layers from the ceiling to the floor in a downdraft booth, carries contaminants away from the work surface rather than stirring them around. Turbulent air does the opposite. It lifts settled particles and deposits them exactly where you don’t want them.
Here is a practical comparison of common booth configurations and how they perform for dust control:
| Booth type | Airflow pattern | Dust control rating | Best use case |
|---|---|---|---|
| Downdraft | Ceiling intake, floor exhaust | Excellent | Full vehicle refinishing |
| Semi-downdraft | Ceiling/upper wall intake, rear exhaust | Good | Smaller shops, panel work |
| Crossdraft | Front intake, rear exhaust | Fair | Lower-volume operations |
| Positive pressure enclosure | Outward through all openings | Excellent | High-contamination environments |
Positive pressure booths prevent external dust ingress by ensuring that air flows outward through any opening, physically blocking outside contaminants from entering the spray zone. This is particularly valuable in facilities where the surrounding environment generates heavy particulate from grinding or fabrication work nearby.
For multi-stage filtration, treat intake and exhaust separately. Intake filtration should use at least two stages: a coarse pre-filter to catch large particles and a finer second stage rated for the work being done. Exhaust filtration serves two purposes. It protects the fan and motor, and it prevents overspray from re-entering air paths or escaping into the environment.
Pro Tip: Do not rely solely on a maintenance calendar for filter changes. Install a differential pressure manometer across each filter bank and replace or service filters when readings exceed the manufacturer’s specified pressure drop threshold. This approach catches early degradation and prevents the gradual airflow loss that creeps up unnoticed. Learn more about optimizing booth efficiency to keep everything running at peak performance.
Housekeeping and prep-area dust capture: best practices
Of course, even perfect booth engineering fails without strict, modern cleaning and prep routines. The sanding dust generated in your prep bay does not stay in the prep bay. It becomes airborne, travels through foot traffic and air movement, and eventually finds its way into your spray booth.
Prep-bay housekeeping and source capture methods, including vacuuming, connected extraction systems, and strict avoidance of compressed air and sweeping, materially affect the dust levels that reach fresh paint. This is not a minor detail. It is a primary variable in your defect rate.
Follow these proven housekeeping principles:
- Use only anti-static HEPA vacuums for all floor and surface cleaning in the booth and prep area. Anti-static vacuums prevent static charge buildup that would otherwise attract particles back onto cleaned surfaces.
- Never use compressed air to blow down surfaces or floors. It re-aerosolizes every settled particle, flooding the air with contamination that takes 20 to 40 minutes to settle again.
- Never sweep floors in or near the spray booth. Brooms throw fine particles into the air column.
- Use vacuum sanding shrouds connected directly to your extraction unit. Source capture at the tool removes up to 90% of sanding dust before it ever becomes airborne.
- Isolate prep and spray operations where possible. Even a partial barrier between sanding stations and the booth opening dramatically reduces migration.
“Switching from broom-and-blowdown cleaning to HEPA vacuum-only protocols is one of the fastest ways to cut dust defect rates. Shops that make this single change often report a noticeable quality improvement within the first week.”
Tiered cleaning schedules are also essential. Daily light cleaning maintains baseline cleanliness between jobs. Weekly deeper cleaning covers floor grates, light fixtures, and wall surfaces where overspray accumulates. A full booth inspection every few months addresses any longer-term buildup that escapes routine cleaning. This is fully detailed in our spray booth maintenance checklist, which gives you a job-by-job and time-based framework your team can follow consistently.
Check out these cleaning best practices for a complete guide that covers booth walls, ceilings, exhaust plenums, and floor systems in detail. Implementing these protocols as documented procedures, not informal habits, is what makes quality consistent across all technicians and shifts.
End-of-line cleaning: the final step before coating
After major airflow and room cleanliness are ensured, zero in on the final surface prep. This is your last defense, and it only takes one oversight to undo everything that came before it.
End-of-line surface cleaning controls, including tack cloths and thorough cleaning immediately before coating, are specifically designed to remove loose particles from prepared surfaces and reduce the risk of dust nibs. Even a surface that looks perfectly clean to the naked eye can carry enough fine particles to cause visible defects once paint flows over them.
Follow these steps without exception on every vehicle, every coat:
- Put on fresh, clean nitrile gloves before touching the prepared surface. Skin oils and clothing fibers are contamination sources.
- Wipe down all tools, spray guns, and hose connections that will be in the booth with a clean, lint-free cloth dampened with booth-safe solvent.
- Unfold a fresh tack cloth and wipe the entire surface in slow, overlapping passes. Work from top to bottom and front to back. Never rush this step.
- Inspect the surface under focused lighting at a low angle to catch any remaining particles or fibers before they get trapped under paint.
- Do not reuse a tack cloth once it has been set down or fully saturated with particles. A loaded tack cloth starts re-depositing contamination rather than removing it.
- Move directly into coating without allowing the vehicle to sit in the open booth for extended periods after tacking.
Pro Tip: Keep your tack cloths in a sealed zip-lock bag between vehicles to prevent them from picking up airborne particles while sitting open. Even a few minutes of exposure in a working shop can load a cloth with enough particulate to affect the next panel you wipe.
These steps, combined with everything covered in ensuring dust-free results, give your team a complete, airtight workflow from the moment a vehicle enters the prep bay to the moment you trigger the spray gun.
Our perspective: the hidden cost of “good enough” dust control
Here is something the industry does not talk about enough. Most shops that have chronic dust defect problems are not completely ignoring dust control. They are doing most of it right. They have a decent booth, they change filters occasionally, and their techs use tack cloths. The problem is the gaps, those small compromises that get normalized over time because they don’t cause visible failures on every single job.
The real cost of inconsistent dust control is not just the rework on the jobs that fail. It is the jobs that look acceptable today but will show early delamination, trapped sanding debris under clear coat, or micro-texture in direct sunlight after the car is returned. These defects don’t show up in the booth. They show up in the customer’s driveway, and they come back as warranty claims or reputation damage.
We’ve seen shops cut their rework rate significantly by adding just two changes: switching to wall and floor protection film that gets peeled and replaced rather than cleaned, and enforcing vacuum-only housekeeping. Neither change requires new infrastructure. Both require discipline and the right materials. The shops that treat dust control as a genuine operational system, not a checklist to get through, are the ones that build the kind of reputation that generates repeat business and referrals. That is the real payoff.
How Dust Free Film supports your dust control system
Building a reliable dust control system means having the right protection at every stage, including the surfaces inside the booth itself.
At Dust Free Film, we manufacture multi-layer electrostatic booth wall and floor protection films engineered specifically for high-volume automotive refinishing environments. Our patented dispenser system makes installation fast and bubble-free, so your team spends time painting, not wrestling with protective materials. The films are heat-resistant and static-free, which means they won’t contribute to the very problem you’re trying to solve. Instead of cleaning overspray-loaded booth walls, you simply peel the used layer and expose a fresh, clean surface. It’s one of the most direct ways to eliminate a major contamination source between jobs. Explore our full range of spray booth protection solutions and see how our products fit into every tier of your dust control system.
Frequently asked questions
How often should intake and exhaust filters be replaced in a spray booth?
Replace intake filters every 2 to 4 months or 200 to 250 hours of use, and replace exhaust filters based on differential pressure readings, typically at 80 to 120 hours. Clogged filters degrade airflow and allow contamination to settle on wet paint.
What is the best way to clean spray booth floors and prep bays?
Use only industrial anti-static vacuums with HEPA filters. Never sweep or use compressed air in or near the spray booth, as both methods lift settled dust into the air column where it can reach fresh paint.
How does positive pressure help keep dust out of the spray booth?
Positive pressure creates outward airflow through booth openings, physically preventing external dust and contaminants from entering the spray zone, which is especially valuable in high-particulate shop environments.
Can compressed air be used for booth cleaning safely?
No. Compressed air re-aerosolizes settled particles and floods the air path with contamination, increasing the risk of dust nibs significantly. Always use HEPA vacuum equipment instead.
What is the final surface cleaning step for dust-free painting?
Wipe the entire surface with a fresh tack cloth immediately before coating, working top to bottom. Never reuse a saturated cloth, as it will re-deposit contaminants rather than removing them.