
TL;DR:
- Proper surface cleaning and preparation are crucial to prevent dust contamination under protective film.
- Consistent, systematic application techniques ensure dust-free, durable installation in spray booths.
- Standardizing installation procedures and training staff improve quality and reduce rework chances.
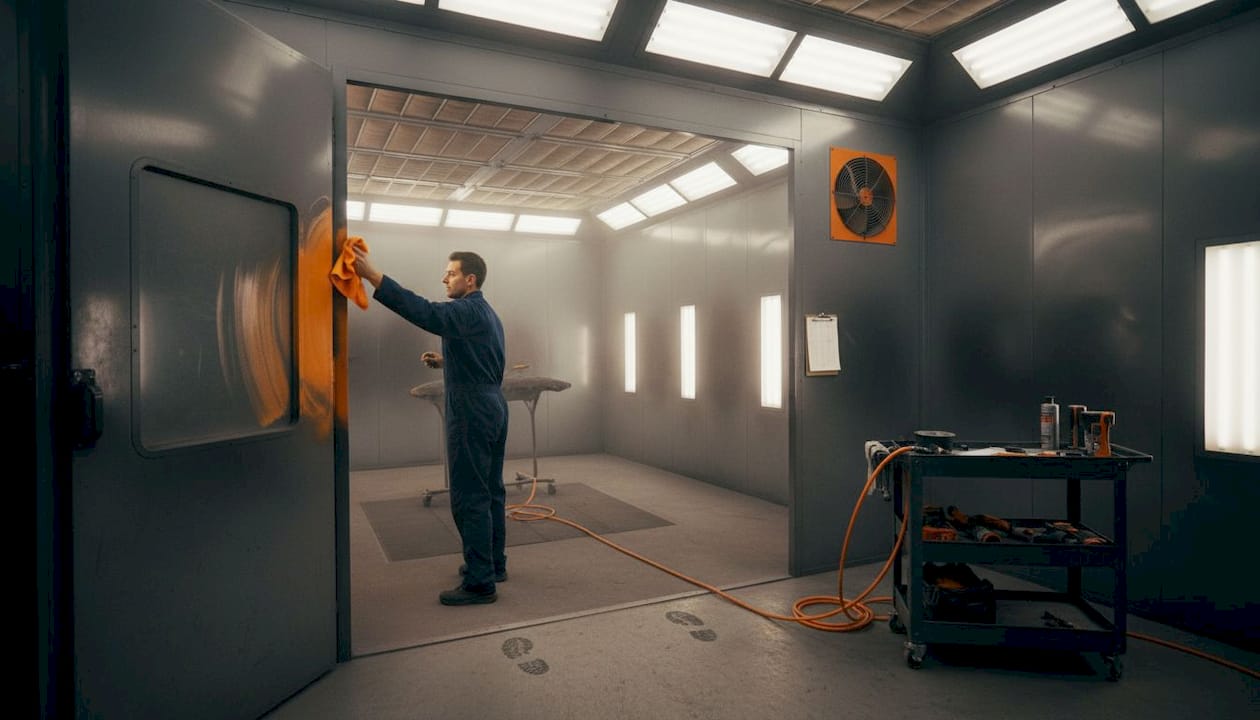
A single dust particle trapped under protective film can mean a complete respray, hours of rework, and a missed delivery deadline. For auto body shops and industrial painting facilities, that scenario repeats itself far too often, and the root cause is almost never the film itself. It’s the installation process. Getting this right requires more than unrolling a sheet and pressing it to a wall. This guide walks you through every stage of a proven, systematic installation method designed to deliver consistent, dust-free results in any spray booth environment.
Table of Contents
- What you need: Tools, materials, and site preparation
- Protective film installation: Step-by-step process
- Troubleshooting common issues and mistakes
- Verifying results: Inspection, maintenance, and expected performance
- The overlooked truth: Why consistency—more than tools—matters most
- Get reliable results with professional-grade dust-free films
- Frequently asked questions
Key Takeaways
| Point | Details |
|---|---|
| Thorough preparation | Cleaning and organizing all tools upfront is crucial for an efficient, dust-free installation. |
| Stepwise application | Following proper order and technique minimizes flaws and maximizes film performance. |
| Proven troubleshooting | Common issues like contamination and bubbles have fast, reliable fixes when you know where to look. |
| Consistent verification | Routine inspections and maintenance checks keep your spray booth operating at peak quality. |
What you need: Tools, materials, and site preparation
Before touching any film, it’s critical to assemble all the right tools and prepare the workspace. Skipping this stage is the single most common reason installations fail before they even start.
Essential tools for the job
Here’s a focused checklist to make sure nothing gets missed:
- Squeegee with felt edge: Used to press the film flat and push out air without scratching.
- Film cutter or precision knife: For clean, controlled cuts along panel edges.
- Heat gun (low setting): Helps conform film around curves and tight corners.
- Lint-free microfiber cloths: Critical for wiping down surfaces without leaving debris.
- Tape measure and marking tape: To position the film accurately before application.
- Spray bottle with clean water or slip solution: Allows repositioning during installation.
- Ladder or scaffold access: Required for full-height wall coverage in taller booths.
Investing in the right installation equipment essentials pays off immediately in reduced errors and faster application time.
Site inspection and cleaning
The booth must be completely clean before any film goes up. Run the booth ventilation system for at least 15 minutes before starting to settle airborne particles. Then wipe all target surfaces, walls, ceiling panels, and floors, with a tack cloth to pick up any remaining dust. Pay close attention to corners, seams, and floor joints where debris accumulates. Following established floor preparation tips before applying floor protection films prevents the most common source of contamination.
Bulk rolls vs. pre-cut kits
This choice directly affects installation speed and accuracy. Bulk rolls give you flexibility for large, flat surfaces like booth walls and ceilings, but they require precise measurement and cutting on-site. Pre-cut kits are engineered to fit specific surface profiles without modification. DIY risks are high for complex panels compared to pre-cut kits, which reduce misalignment and waste on curved or irregular surfaces. For most facilities running mixed booth configurations, having both options available gives you the best of both worlds. Reviewing options for top floor protection films can also help you select the right weight and layering for high-traffic floor zones.
| Film type | Best for | Trade-off |
|---|---|---|
| Bulk rolls | Large flat walls, ceilings | Requires on-site cutting |
| Pre-cut kits | Complex panels, curves | Higher per-unit cost |
| Multi-layer rolls | High-traffic floor areas | Heavier, needs proper dispenser |
Safety note: Always ensure the booth’s electrical systems are off or properly grounded before installation. Static-free film is critical in spray environments to avoid spark hazards.
Pro Tip: Label the cutting zones on your film roll before starting. A few seconds with marking tape saves minutes of trimming errors later.
Protective film installation: Step-by-step process
With preparation complete and workspace free of hazards, you’re ready to start the methodical installation process.
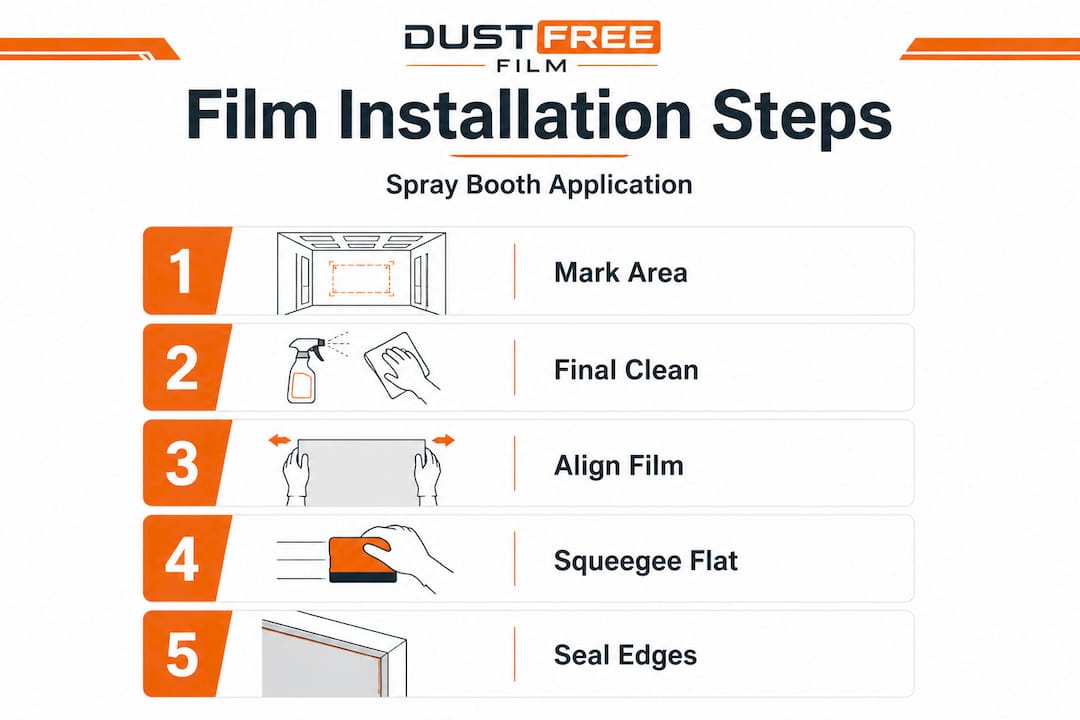
Step 1: Mark your start and end points
Use painter’s tape or a chalk line to mark the exact boundaries where your film will run. This matters more on large walls where even a 2-inch drift throws off alignment across the entire panel. Mark both the top edge and the starting corner as reference points.
Step 2: Clean the surface one final time
Even with pre-installation cleaning done, do a final wipe with a tack cloth right before applying each section. This is not optional. Any particle that gets trapped under the film becomes a visible defect and a contamination source during painting.
Step 3: Position the film and peel the backing
Align the film roll at the top reference mark, securing the leading edge with tape before peeling. Remove the backing in sections as you work down the wall, not all at once. Pulling the full backing off before positioning the film dramatically increases the risk of it folding onto itself or picking up particles from the air.
Step 4: Apply with a squeegee
Work from the center of each section outward in overlapping strokes. Apply steady, firm pressure. This technique pushes air to the edges rather than trapping it in the middle. Overlap each squeegee stroke by about 50% to eliminate missed zones. This detailed film application procedural guide outlines stroke patterns and pressure settings for different film thicknesses.
Step 5: Handle curves and complex surfaces
For curved panels or edges, use your heat gun on its lowest setting. Move it in slow, consistent passes about 4 to 6 inches from the surface. Warm film conforms more easily without the risk of overstretching. Gentle heat for curves is the proven approach, with edges tacked down first before working toward the center. Avoid concentrating heat in one spot for more than 2 to 3 seconds or you risk warping the film.
Step 6: Tack down all edges
Every edge, corner, and seam needs to be firmly pressed down. Use an edge tool or the corner of your squeegee for tight spaces. Loose edges are the most common entry point for dust once the booth is back in operation.
| Installation stage | Common mistake | Correct approach |
|---|---|---|
| Surface cleaning | Using standard cloths | Use lint-free tack cloths only |
| Film positioning | Peeling full backing first | Peel progressively as you apply |
| Squeegee technique | Random strokes | Center-to-edge overlapping strokes |
| Heat application | Holding gun in one spot | Constant movement, 4 to 6 inches away |
| Edge sealing | Pressing only the center | Full edge and corner pressure |
Meeting industry standards for spray booth film application means following a documented, repeatable process, not just getting it close enough.
Pro Tip: If the film shifts slightly during application, don’t tear it off. Spray a light mist of water under the lifted section to reactivate slip, reposition, and re-squeegee from center to edge.
Troubleshooting common issues and mistakes
If you encounter issues during installation, don’t panic. Most problems have proven fixes, and catching them during installation is far less costly than discovering them mid-spray.
Dust inclusions under the film
Visible particles under the film appear as small bumps. If the contamination is near an edge, you can often carefully lift that section, clean the surface with a tack cloth, and reapply. For inclusions in the center of a large panel, the practical fix depends on how critical that zone is. Contamination fixes follow a clear sequence: lift the section, clean the surface, and reapply. Trying to squeegee a trapped particle out without lifting the film almost always causes a tear or a visible scar.
Air bubbles
Not all bubbles are equal. Very small micro-bubbles, under 2 mm, often disappear within 24 to 48 hours as the adhesive cures. Larger bubbles need attention immediately. You can puncture small ones with a fine needle at a shallow angle and then re-squeegee toward the puncture point. For larger air pockets, lift the edge closest to the bubble and re-squeegee from the bubble outward. Reviewing installation challenge examples from real booth environments shows just how frequently this issue appears and how quickly it’s resolved with the right technique.
Film lifting at edges
Edge lifting usually means two things: the surface wasn’t clean enough, or the edge wasn’t pressed down with sufficient pressure during installation. For a quick fix, use a heat gun on low to warm the edge and re-press firmly. For persistent lifting, a thin bead of edge sealant compatible with spray booth environments can be applied. Referencing guidance from quality control in manufacturing reinforces how edge failures cascade into broader process problems when left uncorrected.
Key reminder: Never leave film with unresolved lifting or bubbles before painting. Even a 1-inch gap at an edge is enough to allow dust contamination or overspray migration during a high-pressure paint cycle.
Post-install inspection checklist
Before declaring the installation complete, verify each of the following:
- No visible dust inclusions larger than 1 mm anywhere on the film surface.
- All edges and corners are fully tacked with zero lifting.
- Film clarity is consistent, no streaks, smears, or cloudy patches.
- Overlap seams (if multiple strips were used) are flat with no ridges.
- Floor protection film is anchored at all entry and drainage points.
Verifying results: Inspection, maintenance, and expected performance
Once the film is down, the job isn’t quite over. Final inspection and ongoing care maximize your investment and keep the booth performing at standard.
Conducting a final quality inspection
Walk the entire booth under bright lighting, ideally using a portable LED work light held at a low angle to catch any surface irregularities. Pay specific attention to seams and corners. Check the floor film for any buckled sections that could catch equipment wheels or technician footwear.
If you’re working on a heavily regulated facility, document the installation with photographs before the first painting cycle. This supports compliance reporting and gives you a before-and-after baseline for maintenance tracking. Properly installed film directly supports enhancing booth quality by creating a consistent, sealed environment that minimizes external contamination variables.
Maintenance schedule and replacement intervals
| Film zone | Inspection frequency | Replacement trigger |
|---|---|---|
| Wall film (upper) | Every 30 cycles | Visible saturation or opacity change |
| Wall film (lower) | Every 15 cycles | Overspray buildup exceeding 20% coverage |
| Floor film | Weekly | Tears, buckles, or adhesive failure |
| Corner and edge film | Every 20 cycles | Any lifting detected |
The dust-free outcomes produced by correctly installed and regularly maintained film translate directly to measurable operational improvements: fewer defects per batch, reduced cleaning time between cycles, and lower material waste.
Facilities that implement a structured maintenance schedule, aligned with guidance from production quality improvement frameworks, consistently report measurable gains in first-pass quality rates. Edge contamination incidents, which are among the most disruptive defects in automotive refinishing, drop significantly within the first maintenance cycle after a proper installation.
Operational performance expectations
A clean, precise installation creates a verifiable chain of quality. When the film is sealed, flat, and free of inclusions, the spray environment is controlled. Controlled environments produce fewer rejects. Fewer rejects mean faster cycle times and higher throughput without adding staff or equipment.
The overlooked truth: Why consistency—more than tools—matters most
Here’s something the industry rarely says plainly: the best film on the market still fails when applied inconsistently. We’ve seen facilities invest in premium multi-layer protective films, top-tier squeegees, and professional-grade heat guns, only to get mediocre results because no one standardized the process.
The real competitive advantage in spray booth performance comes from repeatability. Every technician who applies film in your facility should follow the same sequence, use the same stroke pattern, and check the same edge points in the same order, every single time. Not because it sounds disciplined, but because variance in technique is where contamination enters.
Think of it this way: a professional paint finish has tolerances measured in microns. A film installation process with tolerances measured in “however it feels that day” is incompatible with those standards. The film durability factors that matter most include not just material quality but the consistency of how that material is applied and maintained.
Facilities that invest time in training staff on a documented installation procedure, even a simple one-page checklist, consistently outperform facilities that rely on experienced technicians working from habit. Habits drift. Documented processes don’t. If you want to reduce rework rates and improve compliance outcomes, standardize the installation method before upgrading the materials.
Get reliable results with professional-grade dust-free films
The steps in this guide work best when paired with film engineered specifically for spray booth environments. Generic protective films often lack the static-free properties and heat resistance that professional spray cycles demand.
At Dust Free Film, we’ve been manufacturing and supplying dedicated dust-free film solutions for auto body shops and industrial painting facilities since 2012. Our multi-layer electrostatic booth wall and floor protectors are designed for quick, bubble-free installation using our patented dispenser system, built to the standards your process requires. Whether you need bulk rolls for large facilities or pre-cut configurations for complex panels, we can help you find the right fit. Request a quote today and talk to our team about what your specific booth setup needs to stay consistently dust-free.
Frequently asked questions
What is the best way to prevent dust contamination during installation?
Thoroughly clean both the booth and the surface before starting, and use lint-free tack cloths to avoid trapping debris under the film. If contamination does occur, the correct response is to lift and reapply the affected section rather than trying to push particles out.
How do I fix bubbles under the protective film after installation?
Small bubbles can be punctured gently with a fine needle and then pushed flat with a squeegee, while larger air pockets require lifting the nearest edge and re-squeegeeing toward the outside. Puncture or re-squeegee are the two main approaches depending on bubble size.
Is it better to use pre-cut kits or bulk film rolls for complex panels?
Pre-cut kits reduce DIY risks on complex surfaces and provide a more accurate fit compared to bulk rolls that require on-site cutting. Pre-cut kits are particularly valuable for curved panels and irregular booth configurations where measurement errors compound quickly.
How should I treat curved surfaces during installation?
Use a heat gun on its lowest setting in slow, consistent passes to help the film conform to the curve without overstretching or melting. Tack edges first before working toward the center of the curved section for the cleanest result.
Recommended
- Protective film application: step-by-step guide for spray booths
- Spray Booth Floor Protection Tutorial for Dust-Free Results
- How to choose protective films for cleaner spray booths
- Step-by-Step Guide to Spray Booth Safety Solutions
- How sandblast rooms work: essential guide for industrial surface prep – Blast Trader