
TL;DR:
- Proper maintenance of paint finishes depends on matching cleaning methods and protective products to each finish type and operating environment. Regular inspection, decontamination, and thickness measurements help prevent premature coating failure, especially in industrial settings, where risk-based schedules are essential. Organizing the correct tools, proper storage, and adhering to a routine prolongs finish durability and ensures optimal appearance over time.
Maintaining paint finishes means matching your cleaning methods, protective products, and inspection schedules to the specific finish type and operating environment. Whether you oversee an auto body shop, manage industrial equipment, or maintain a vehicle fleet, the difference between a coating that lasts three years and one that lasts twelve comes down to how consistently and correctly you care for it. Benjamin Moore recommends waiting at least 30 days before cleaning freshly painted surfaces, a rule that applies equally to vehicles and machinery fresh out of the spray booth. Tools like pH-neutral cleaners, microfiber cloths, and film thickness gauges form the foundation of any professional maintenance program.
Guide to maintaining paint finishes by finish type
The single most damaging mistake in paint care is applying the same cleaning routine to every finish. Flat and matte finishes last 5 to 7 years, satin finishes last 7 to 10 years, and semi-gloss finishes last 8 to 12 years with proper care. That lifespan gap is not accidental. It reflects how much abuse each finish can absorb before degrading.
Flat and matte finishes
Flat and matte coatings are the least durable of all finish types. They have no sheen layer to deflect abrasion, which means any scrubbing pressure transfers directly to the paint film. Use a damp microfiber cloth with plain water or a highly diluted pH-neutral cleaner, and blot rather than wipe. Never use a scrub pad or concentrated degreaser on a matte surface.
Satin and eggshell finishes
Satin and eggshell finishes tolerate mild soap solutions and light wiping pressure. These are the workhorses of interior and equipment surfaces because they balance cleanability with a low-sheen appearance. A few drops of dish soap in warm water, applied with a soft sponge, handles most contamination without risking finish damage.

Semi-gloss and gloss finishes
Semi-gloss and gloss coatings are the most durable and the most forgiving to clean. They resist moisture, grease, and mild chemical exposure better than any other finish type. That said, harsh scrubbing strips paint finish and creates dull patches even on gloss surfaces. Always test any new cleaner on an inconspicuous area before applying it broadly.
- Use pH-neutral cleaners on all finish types. Alkaline or acidic cleaners accelerate paint breakdown regardless of sheen level.
- Clean high-traffic surfaces monthly and low-traffic surfaces quarterly. Frequency should reflect exposure, not habit.
- Avoid abrasive sponges, steel wool, or stiff-bristle brushes on any painted surface.
- Rinse cleaning residue completely. Soap film left on a surface attracts dust and degrades gloss over time.
Pro Tip: Label your cleaning supplies by finish type. Keeping a dedicated microfiber cloth for matte surfaces and a separate sponge for gloss surfaces prevents cross-contamination and accidental damage.
How to build a seasonal maintenance routine for vehicles and machinery
Vehicle and machinery paint care is not a single event. It is a repeating cycle tied to environmental exposure. Seasonal preparation before sealing improves protective layer adhesion and durability, which means the order of operations matters as much as the products you use.
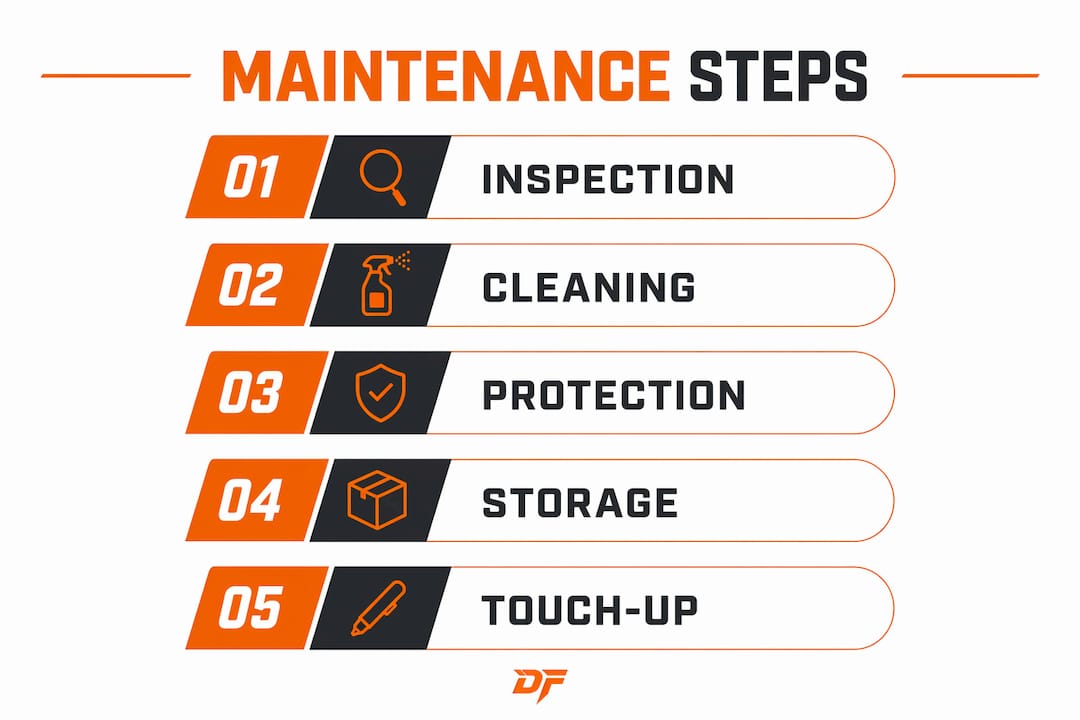
Follow this sequence for each seasonal maintenance cycle:
- Wash thoroughly with pH-neutral shampoo. Remove road salt, industrial fallout, brake dust, and biological contamination before applying any protective product. Applying wax or sealant over contamination locks the debris against the paint film.
- Decontaminate the surface. Use an iron remover or clay bar treatment to pull embedded particles that washing alone cannot remove. This step is non-negotiable before sealing.
- Inspect for damage. Look for chips, scratches, and areas where the clear coat has begun to lift. Address these before applying protection so moisture cannot migrate under the film.
- Apply a sealant or wax. Polymer sealants last three to six months and outperform carnauba wax in UV resistance. Apply on a cool surface, out of direct sunlight, to prevent premature curing.
- Protect rubber seals and trim. Tire and rubber seal conditioners prevent cracking that allows moisture to reach painted edges. Neglecting rubber accelerates paint failure at panel seams.
- Document the condition. Photograph any damage before and after treatment. A condition log lets you track deterioration rates and plan touch-ups before they become full repaints.
Pro Tip: Never apply wax or sealant to a hot surface. Heat causes the product to cure unevenly, leaving streaks and reducing protection. Work in shade or wait until surface temperature drops below 90°F.
For automotive applications, the decontamination then protection sequence is the professional standard because cleansing before sealing is what guarantees adhesion. Skipping decontamination is the most common reason protective coatings fail prematurely.
What industrial coating maintenance actually requires
Industrial paint finish maintenance operates on a different standard than consumer vehicle care. A professional approach verifies surface preparation and coating thickness rather than relying solely on visual inspection. This distinction separates facilities that replace coatings every five years from those that stretch the same coating to fifteen.
The two measurements that matter most are wet film thickness (WFT), taken during application, and dry film thickness (DFT), taken after the coating cures. WFT tells you whether the applicator is depositing enough material. DFT confirms whether the cured film meets specification. A coating that looks perfect visually can still be under-spec and fail within two years under industrial exposure.
| Inspection Type | What It Detects | When to Perform |
|---|---|---|
| WFT measurement | Under or over-application during spraying | During application |
| DFT measurement | Cured film thickness vs. specification | After full cure |
| Salt contamination test | Chloride levels that cause under-film corrosion | Before recoating |
| Adhesion test | Bond strength between coating and substrate | After cure and before handover |
| Pinhole and holiday detection | Voids in the film that allow moisture ingress | After application |
Visual signs like rust, blistering, and fading indicate when metal protective coatings require closer monitoring or replacement. These signs are triggers for escalation, not the primary inspection method. Annual inspections adjusted by coating type and environment consistently outperform reactive maintenance in extending coating life.
Budgeting 2 to 5% of the original coating project cost annually for inspections, touch-ups, and minor repairs keeps industrial coatings effective without requiring unplanned capital expenditure. A properly documented baseline condition assessment and priority matrix based on failure consequences guide efficient maintenance scheduling. Facilities that skip this step typically face emergency recoating costs that run three to five times higher than what a structured maintenance program would have cost.
What tools and products actually belong in your maintenance kit
The right tools make the difference between a maintenance routine that protects the finish and one that slowly degrades it. Organizing your kit by function prevents the wrong product from reaching the wrong surface.
Cleaning tools:
- Microfiber cloths (minimum 300 GSM weight) for wiping and buffing without scratching
- Soft natural sponges for applying soap solutions to curved or textured surfaces
- Soft-bristle detailing brushes for cleaning around trim, vents, and panel gaps
- Two-bucket wash system to prevent reintroducing contamination during washing
Protective products:
- pH-neutral soap or shampoo for all routine washing
- Polymer sealant for UV and chemical resistance on vehicle and equipment panels
- Carnauba wax for gloss enhancement on show-quality or low-exposure surfaces
- Specialty industrial topcoat touch-up products matched to the original coating specification
Inspection instruments:
- Magnetic or ultrasonic film thickness gauge for DFT verification
- Adhesion tester (cross-cut or pull-off type) for bond strength confirmation
- UV lamp for detecting pinholes and holidays in dark or opaque coatings
Proper paint storage using sealed lids and labeling with color, sheen, brand, and application location makes future touch-ups possible without a full repaint. Press plastic wrap directly onto the paint surface inside the can before sealing to prevent skin formation. Store cans upside down to create an airtight seal using the paint itself. For quantities under a quart, transfer to a glass mason jar, which seals better and shows the color without opening.
For automotive shops, reviewing automotive painting best practices alongside your tool selection helps align your maintenance kit with the environment where the finish was applied.
Key takeaways
Effective paint finish maintenance requires matching cleaning intensity to finish durability, following a decontamination-first sequence for protection, and using thickness measurements rather than visual inspection alone for industrial coatings.
| Point | Details |
|---|---|
| Match cleaning to finish type | Flat finishes need gentle blotting; gloss finishes tolerate mild cleaners but not abrasive scrubbing. |
| Follow the decontamination sequence | Always clean and decontaminate before applying sealant or wax to guarantee adhesion. |
| Measure thickness, not just appearance | WFT and DFT measurements confirm coating integrity where visual checks cannot. |
| Budget for industrial maintenance | Allocate 2 to 5% of original coating cost annually to avoid emergency recoating expenses. |
| Store paint correctly for touch-ups | Sealed, labeled containers with plastic wrap inserts extend paint usability for years. |
Why prevention beats reaction every time
Most coating failures I have seen in industrial and automotive settings share one cause: the maintenance program started too late. Facilities wait for visible rust or blistering before scheduling an inspection, and by that point the coating has already failed at the substrate level. The surface looks bad because the problem started months or years earlier, below what any visual check could catch.
The uncomfortable reality is that industrial maintenance should be risk-based rather than calendar-driven. A steel structure in a coastal environment needs inspection every six months. The same structure in a dry inland facility might go two years between checks. Applying the same schedule to both wastes money in one case and allows preventable failure in the other.
What I have found actually works is building a condition baseline on day one. Photograph every panel, record every thickness measurement, and note every environmental exposure factor before the coating even cures. That baseline becomes your reference point for every future inspection. Without it, you are guessing whether a reading of 180 microns represents deterioration or was always within spec.
For vehicle paint, the same principle applies at a smaller scale. Gentle, consistent routines prevent damage far more effectively than aggressive correction after the fact. A monthly wash and quarterly sealant application costs a fraction of a full paint correction or respray. The shops and fleet managers who understand this treat paint finish quality as an ongoing operational standard, not a one-time achievement.
— Dust
How Dustfreefilm supports flawless paint finish outcomes
The maintenance work described in this article only delivers results when the paint application itself starts clean. Dust contamination during spraying is the leading cause of finish defects that no amount of post-cure maintenance can fully correct.
Dustfreefilm manufactures multi-layer electrostatic booth wall and floor protectors designed specifically for automotive refinishing and industrial spray booth environments. The films are heat-resistant, static-free, and install quickly using a patented bubble-free dispenser system. By eliminating airborne dust at the source, Dustfreefilm gives your maintenance program a clean foundation to protect. Explore the full range of spray booth protection solutions or request a tailored quote for your facility’s configuration.
FAQ
How long should you wait before cleaning a freshly painted surface?
Wait at least 30 days before cleaning freshly painted surfaces. Benjamin Moore recommends limiting spot-cleaning before that point to avoid damaging the paint during early curing.
What is the best cleaner for painted surfaces?
A pH-neutral soap or shampoo is the correct choice for all painted surfaces. Alkaline or acidic cleaners accelerate paint breakdown regardless of finish type or sheen level.
How do WFT and DFT differ in coating inspection?
Wet film thickness (WFT) is measured during application to confirm correct deposit volume. Dry film thickness (DFT) is measured after curing to verify the finished coating meets specification.
How often should industrial coatings be inspected?
Inspection frequency should reflect environmental exposure and coating type rather than a fixed calendar. Coastal or chemically aggressive environments typically require inspection every six months, while protected indoor assets may need annual checks.
How do you store leftover paint for future touch-ups?
Seal the can with plastic wrap pressed directly onto the paint surface, label it with color, sheen, brand, and location, and store it upside down. Transfer small quantities to a glass mason jar for a better airtight seal.